Welcome to Wiremo! Below we will explain to you how to set up an Automated Review Request (ARR) campaign for your Shopify store using the Wiremo app. It's easy as pie. Before configuring the ARR campaign start your free trial account and configure the Wiremo review app for Shopify.
In this short tutorial, we will show you how to remove Wiremo Shopify app from your website.
Important:Please, note that once you'll delete the app you won't be able to access Wiremo Dashboard to retrieve your Customer Reviews or/and Q&A.
We'll send your Customer Reviews and Q&A, exported in a CSV file and will delete your Wiremo account in 48h per Shopify GDPR rule.
If you want to migrate to another platform please, contact us immediately after you have deleted your Shopify app.
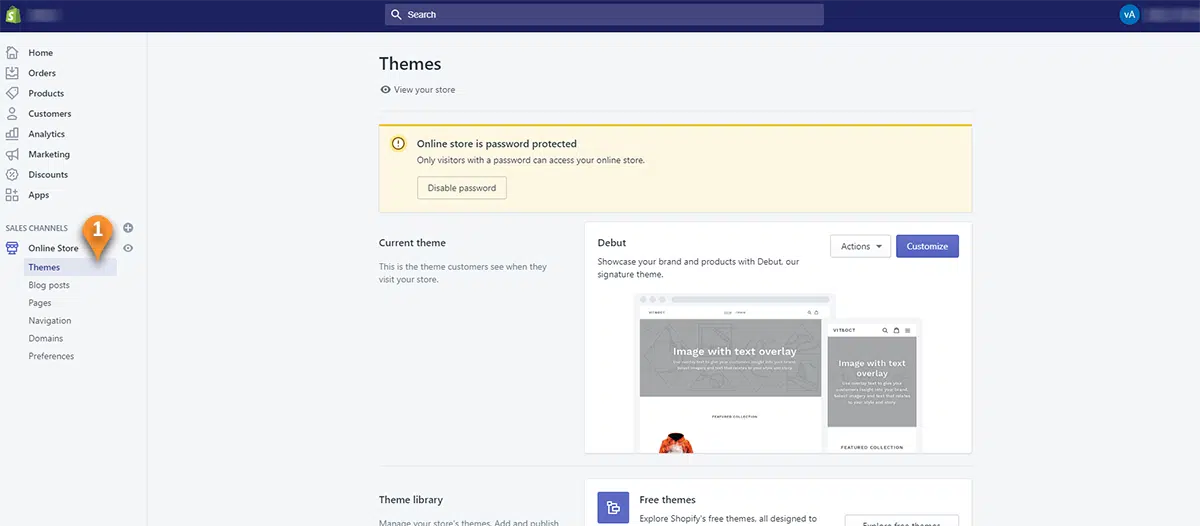
First, go to your Shopify Admin page and then select Themes (pin 1).
In the actions drop-down menu choose the “Edit code” option to access your active theme’s files (pin 2).
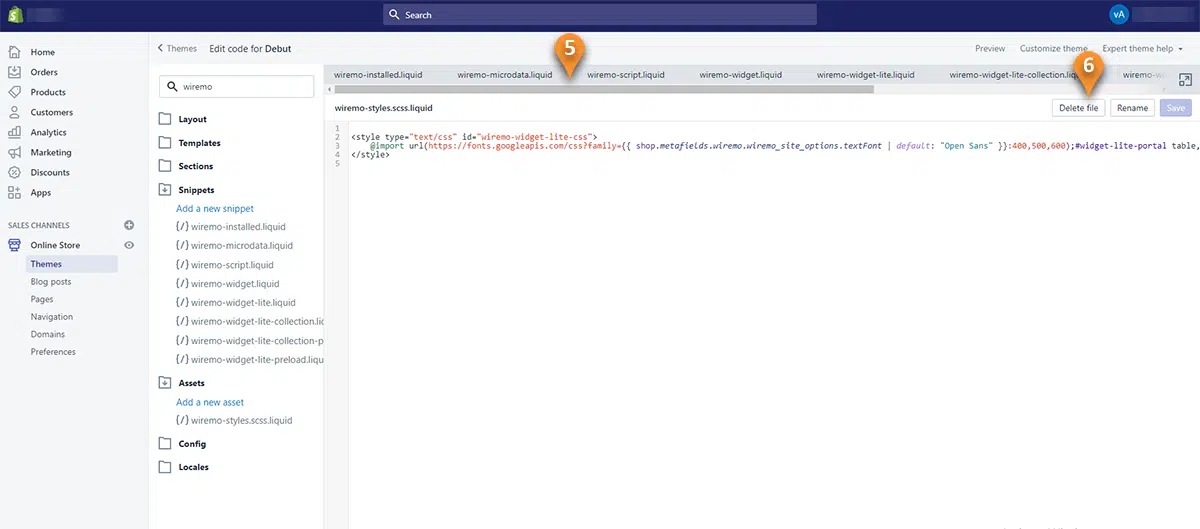
Search for “Wiremo” in your theme files (pin 3) and delete all Wiremo snippets and Assets (pin 4).
For that, you need to open every file starting with "wiremo" in separated tabs (pin 5) and click on the “Delete file” button for every file separately (pin 6). Once done click on the “Save” button. After that refresh the Shopify dashboard and repeat the search for Wiremo files to make sure that there is nothing more to delete.
Below is the list with files and codes you have to delete:
collection.liquid - remove this code:
{% include "wiremo-script" %}
index.liquid - remove this code :
{% include "wiremo-script" %}
product.liquid - remove this code :
{% include "wiremo-microdata" %}
Sections folder -> product.template.liquid - remove these codes :
{% include "wiremo-widget-lite" %}{% include "wiremo-widget" %}{% include "wiremo-script" %}
Snippets folder -> product-card-grid.liquid - remove this code :
{% assign wiremo_widget_lite_product_url = product.url %}{% include "wiremo-widget-lite-collection" %}
Here you can learn how to cancel your Wiremo plan if you’re using a platform other than Shopify.
If you have any questions, please don't hesitate to ask our support team through live chat on our website. We are always here to help you. Thank you for choosing Wiremo.
On the next page click on the “Install app” button to proceed with the installation.
We will proceed with the installation. Wiremo app charges you on a usage basis, you will pay only for what you use, you can check the Wiremo Growth plan prices by accessing the Pricing page for Shopify. Once you are ready click on the “START FOR FREE” button (Pin. 1). If you are on a development store, you will have the option to skip to 14 days Trial (Pin. 2).
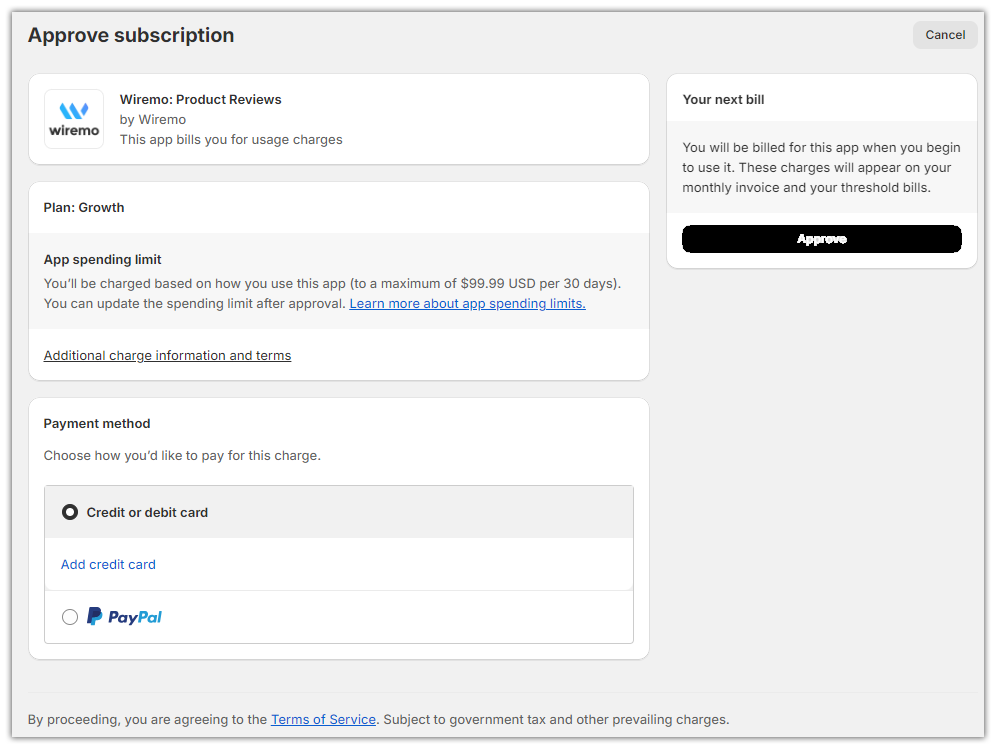
On the next screen, you will need to Approve your Wiremo subscription by clicking on the "Approve" button.
On the "Wiremo Setup", choose one of the options to continue the installation. You can select either Automatic (Pin. 3) or you can choose Manual installation (Pin. 4).
Further, we will proceed with Automatic installation. Click on “Let’s get started” (Pin. 3). For manual installation refer to the last step of this guide.
Wiremo Installation
To install the Wiremo Review widget on your product page, follow these steps:
Click on the Review widget (Pin. 5) to install it on the product page - this will install the Review widget on all of your product pages.
On the next window, you will be redirected to the Shopify product customization and you will see the Wiremo review widget block (Pin. 6), you can drag the Wiremo block exactly where you want it to be displayed and make sure to click on the "SAVE" button (Pin. 7).
Next, go back to the Wiremo installation and Click on the Rating widget (Pin. 8) to install it on the product page - this will install the Rating widget (stars) on your product pages.
On the next window, you will be redirected to the Shopify product customization and you will see the Wiremo rating widget block (Pin. 9), you can drag the Wiremo block exactly where you want it to be displayed (As a standard setting, the product rating stars are below the product title) and make sure to click on the "SAVE" button (Pin. 10).
Next. go back to the Wiremo installation click on the "YES, I CLICKED SAVE" button (Pin. 11), and continue the Wiremo installation.
Personalize your review widget
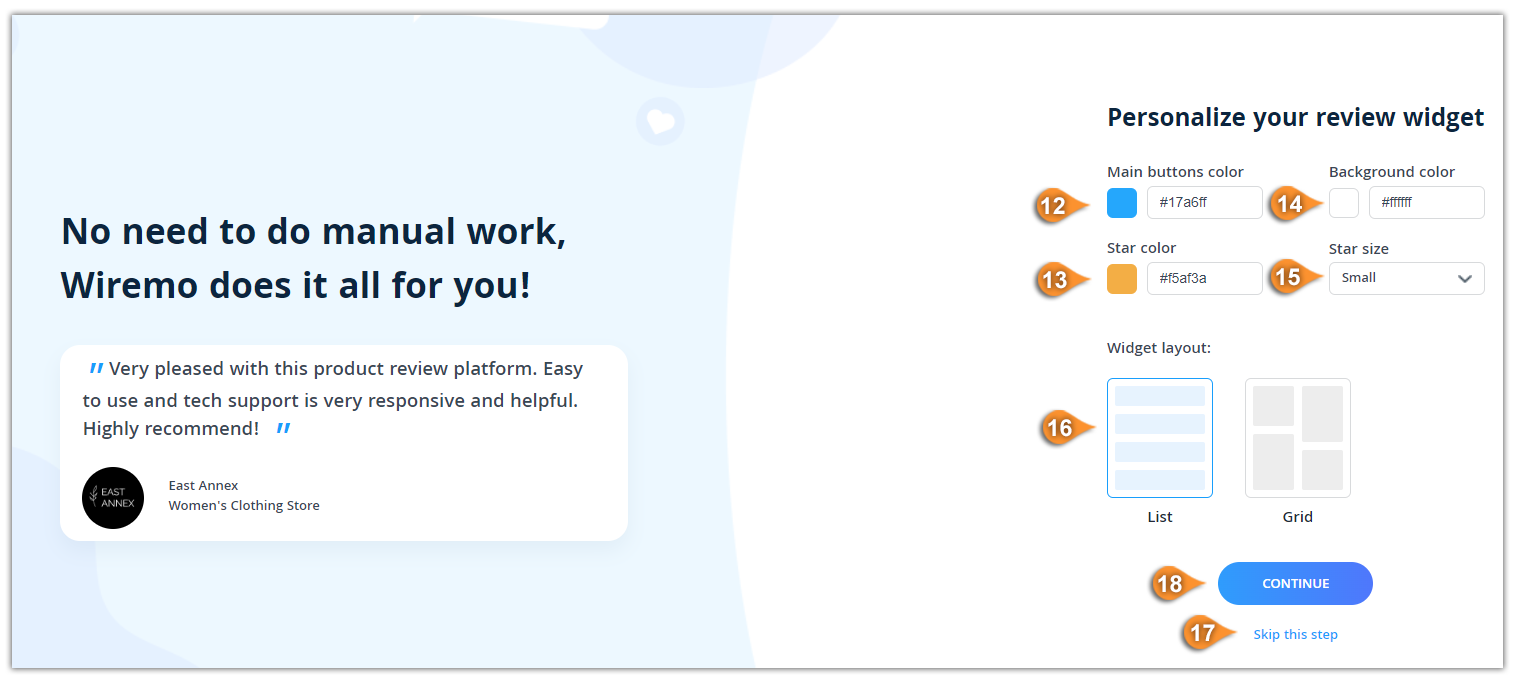
In this step you can change the color of your Main buttons (Pin. 12), Star color (Pin. 13), and widget background (Pin. 14). Also, the Star size can be changed to Small, Medium, or Large (Pin. 15).
Next, select the Widget Layout “List or Grid” - this will be the design of the review widget (Pin. 16).
Once done, click on the “Continue” button (Pin. 18).
Note:You can skip this step and customize these later under your Wiremo dashboard (Pin. 17).
Personalize your review request email
This setting allows you to set up Automated Review Request which will automatically send a review request to your customers after purchase from your store.
Send email in: Select the number of days after purchase (the order should be marked as fulfilled) you want to ask your customer for review (Pin. 19).
After: The review request email will only be sent after fulfillment and according to the selected days in the “Send email in” option (Pin. 20).
Email sender name: You should type your Business name (Pin. 21).
Email from: You should avoid using public domains for the email field. Your emails are likely to go to the SPAM folder. Using a private domain provides easy identification to your customers (Pin. 22).
Email subject: Enter a subject for your review request email (Pin. 23).
Email text: You can use the default text or change it to your preferred (Pin .24), you can also add variables (Pin. 25).
You can send a test email (Pin. 26), and if it’s all good, you can click on the “Continue” button (Pin. 27).
Note:You can always change these later under your Wiremo dashboard.
Installation Instructions
The Wiremo review widget has been already installed on your Shopify store and you can check it by clicking on the product page (Pin. 28). Also, you can change the notification email (Pin. 29). If you are happy with the Wiremo installation click on the “Yes, all good” button (Pin. 30). Use “Skip or reinstall the plugin” if you do not see the Wiremo widget installed on your store (Pin. 31).
Great! Wiremo is Installed
On the next page, you can go to the Wiremo dashboard (Pin. 32), Import reviews (Pin. 33), or go to the plugin settings (Pin. 34). All the next changes can be done from your Wiremo dashboard.
Shopify App General Settings
Hide Stars when no reviews: allow you to hide widget lite ( rating star widget ) when there are no reviews associated with the product.
Automatic authentification for customers: your customers won't need to authenticate their reviews as it will be done automatically.
Sync product statistics: this function is used to synchronize review statistics with your website, in case you have imported your reviews from other platforms.
Reinstall the Wiemo app: this allows you to delete the Wiremo app and start the process from scratch.
Notification Email: set an email on which you will get all the notifications about new reviews, Q&A, or conversation emails.
Here is an example of the Wiremo review widget on a product page.
Manual installation
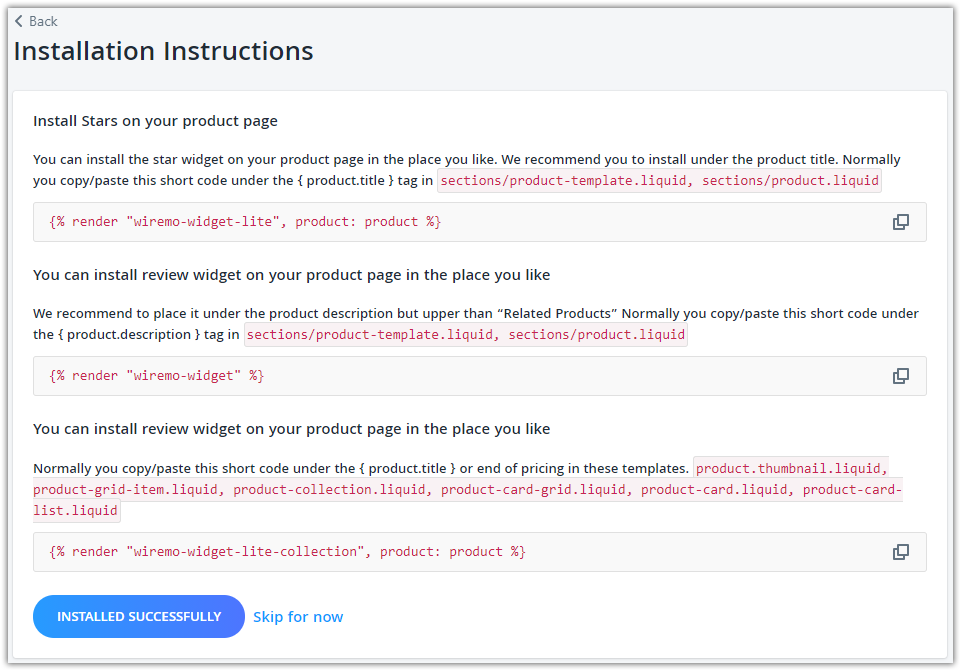
This type of installation gives you full control over the widget placements in your store. These are shortcodes used to make the display of Wiremo widgets. Each of the options is followed by instructions. Once you are done you can click on “Installed successfully” which will trigger plugin installation on your store.
In this guide, we will describe how to remove Wiremo from your Squarespace website.
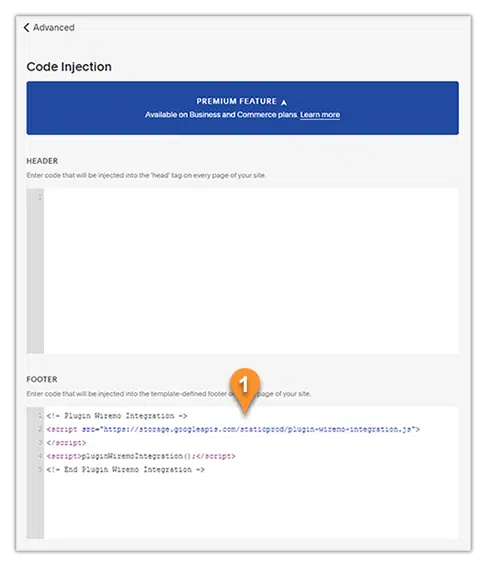
First, you need to access the Squarespace admin page, Select Settings -> Advanced -> Code Injection, and you will be prompted to the page where you’ve imputed Wiremo plugin code on initial setup.
Remove plugin code from Footer (or Header if you’ve inputted it there) and Save changes. See the plugin code in the image below. (Pin 1)
Once you remove it, you will no longer receive the “Payment issues” message on your website. (Pin 2)
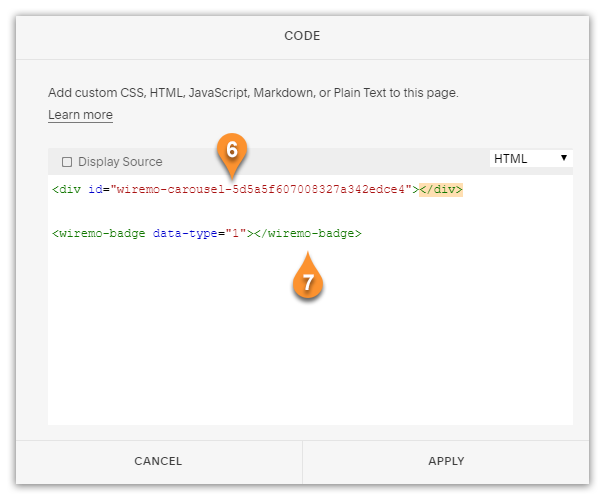
Important:If you have a Classic Squarespace website or set up a custom review page note to also remove div code. (Pin 3)
To remove Wiremo Carousel or Wiremo Badge, you will have to delete the code from the Squarespace -> Code Injection. (Pin 4 and Pin 5)
Once done, don’t forget to remove the div codes from pages as well, as shown in the example below. (Pin 6 and Pin 7)
Now you’re all done.
If you have any questions, please don't hesitate to ask our support team through live chat on our website.
If you are moving your website from Squarespace to Shopify you can easily migrate your existing reviews. Login to Dashboard and go to Reviews (pin 1). In the right corner of the tabs press on the "Migrate Reviews" button (pin 2).
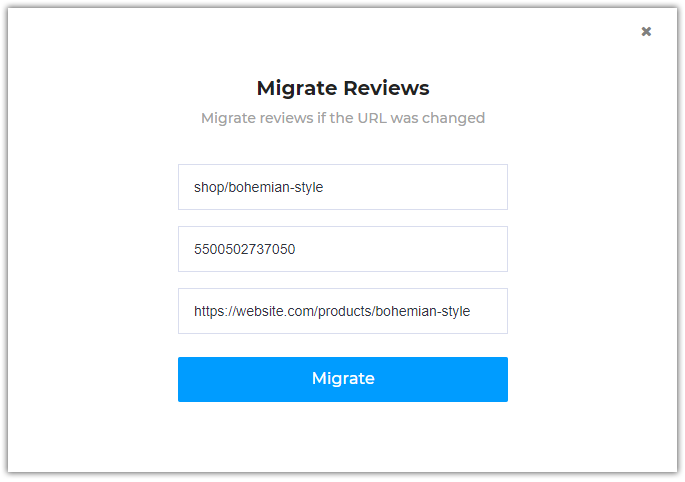
In the opened pop-up window please fill in all the fields to be able to migrate your reviews:
“Old identifier”: Find it under your Wiremo Dashboard -> Reviews, click on the review you want to migrate and then check the identifier.
The identifier can be either URL path or product ID:
Ex. /shop/product1/ or 56c449e28a65e2pop48300bc
“New identifier”: This will be the Product ID of the product page you want to migrate the review(s).
Ex: 5500502737050
“New URL”: The URL where your review will be migrated. Ex:
https://website.com/products/bohemian-style
Note:For Shopify products the identifier is the “Product ID”. If you migrate review to a non-product page use URL path as identifier.
To find your Shopify Product ID go to your Shopify admin page and click on Products
Select the product in your Shopify store you want to migrate the review to (pin 4)
Go to the URL at the top and copy the number that comes after ‘…/products/’ as it is marked in the screenshot below. Use this product ID as identifier for this product page.
To start the migration process please press the "Migrate" button in your Dashboard. Below you can see an example of the migration pop-up window with all the fields fulfilled.
Once the process is finished you will be notified. If you have any question our support team is always online to help you. Thank you for choosing Wiremo!
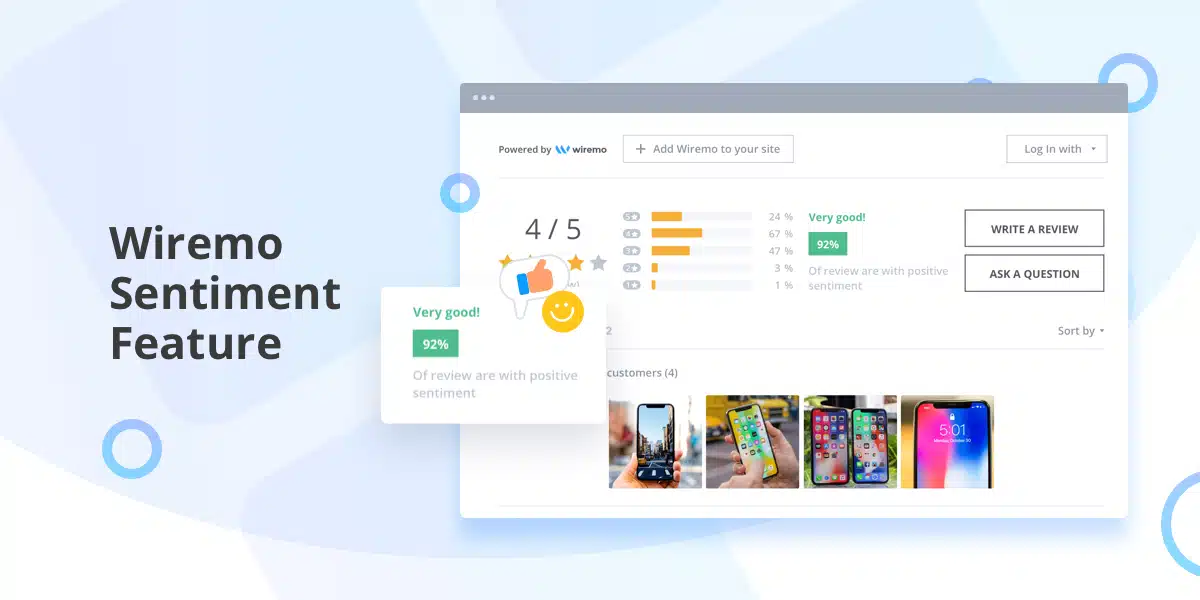
As you already know we've implemented a new feature - Analyze review sentiment using Artificial Intelligence (AI). It helps you check what the text of the reviews is expressing, is it neutral, positive or negative. Now we would like to present to you the second option to use the AI to help your potential customers to see the main review keywords that were used in your customer reviews. We are proud to present you the Review Keywords feature.
What is Review Keywords feature and how it works
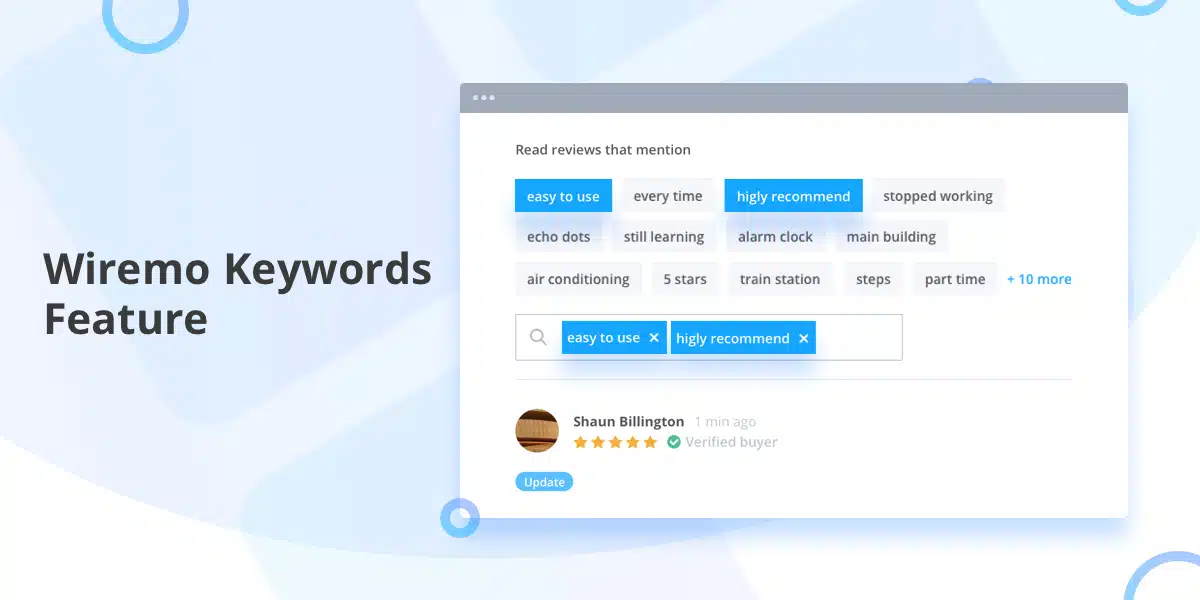
Same as the Sentiment Filter feature the Review Keywords feature is a special one and we use Google AI for it. Using AI, we provide you the possibility to check, find and show the most used words from your latest customer reviews. We call them Review Keywords. Below are some examples of how it works in the widget.
Review Keywords
As you can see from the screenshot the review keywords are placed in a separated block "Read reviews that mention" (pin 1). Below are displayed the most used review keywords from your customer reviews. Once your customer press a review keyword (pin 2) the reviews will be sorted and will be shown only reviews that contain the selected keywords. The selected review keywords will be highlighted in the sorted reviews (pin 3). Your customer can select multiple review keywords at the same time. To clear the sort results and start sorting again there is the "Clear all" link (pin 4).
Search in reviews
Also related to review keywords, there is the search option. For example, your potential customer didn't found the desired review keyword in the list and want to filter using some special review keywords. For this, we've added the search input. It works the same as by pressing a review keyword. The results are displayed in the same way. The input process is easy, just type a review keyword and press enter.
If you use search before selecting review keywords it will search in all shown reviews, in case the keyword was selected the search will work only for selected reviews.
Search + Keywords
Important to mention is that the keywords and the search option can be used at the same time.
How to enable the Review keyword filter feature
To enable the feature go to Customize->App Design->General Settings. Scroll down to the final block. Here you can find 2 options
Show review keywords - it will enable showing the most used review keywords in the widget.
Show search - it will enable the search input in the widget.
You can use them both at the same time or use them separately.
If you have any questions, please don't hesitate to ask our support team through live chat on our website. We are always here to help you. Thank you for choosing Wiremo.
The Wiremo auto-approve feature is awesome. This is very important to save your time and focus on your business. Also, a very useful and important thing that you can use nowadays is the AI (Artificial Intelligence) to analyze your reviews. We are proud to announce that now you can use it with our new Sentiment Filter feature. Below we will explain what is this, how to use it and why you need it.
There are lots of notification emails while getting and managing your customer reviews through Wiremo. And we understand that it is very important that all these emails should fit your website design. That's why we've focused to provide you the possibility to adjust all the notification emails. Below we will explain how you can customize all these emails.
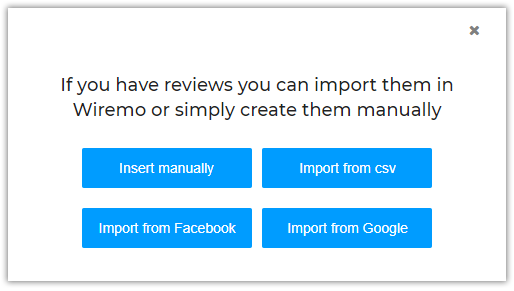
First, you need to login to your Wiremo Dashboard and go to Reviews (pin 1). In the right corner of the tabs press on the "Import reviews" button (pin 2).
In the opened pop-up window press on the "Import from Facebook" button.
Choose the account that you want to use to continue.
Now select the page that you want to use to import reviews and press the "Next" button.
Please read the permissions that are allowed for the Reviews by Wiremo and press the "Done" button.
After that, you will see the confirmation that you've linked Reviews by Wiremo to your facebook page. Press the "Ok" button.
In case you've linked with Wiremo more than one page, on the next step choose the page you want to use to import reviews and press the "Import" button.
Once you're done you will see a pop-up showing you how many reviews were imported.
Important:Facebook reviews with ratings will be imported with the same rating. Reviews with status "Recommend" or "Not recommend" will be imported with the 5 and 3 rating stars, respectively. Also please note that we import only the reviews/recommndations with text, we do not import replies because anyone can reply to the review.
Important:After importing facebook reviews to Wiremo Dashboard it is very important to change the identifier and the reviews' URL. This way your reviews will be displayed properly. After importing the reviews the default identifier will be "pagename-page" and the default URL "host+/reviews/"
If you have any additional question please don't hesitate to contact our support team through live-chat or submit a ticket. Thank you for choosing Wiremo.
Get more reviews without any hassle. Our QR Code for Google Review page generator makes it simple for customers to leave feedback and boost your business.
How to import customer reviews from Google Business Profile
First, log in to your Wiremo Dashboard and go to Reviews (pin 1). In the right corner of the window press on the "Import reviews" button (pin 2).
In the opened pop-up window press on the "Import from Google" button.
Now you need to sign in to your google account to continue.
At the next step, you'll be asked to grant permission for Wiremo to manage your business listing.
Check everything once again. To confirm just press the "Allow" button.
In case you have more than one business profiles, choose the profile you want to use to import reviews and press the "Import" button.
Once you're done you will see a pop-up showing you how many reviews were imported.
Important:We import only the reviews with text and the admin replies.
Important:After importing google reviews to Wiremo Dashboard it is very important to change the identifier and the reviews' URL. This way your reviews will be displayed properly. After importing the reviews the default identifier will be "pagename-page" and the default URL "host+/reviews/"
If you have any additional question please don't hesitate to contact our support team through live-chat or submit a ticket. Thank you for choosing Wiremo.
The most important thing for an eCommerce website is to get more money, constantly get reviews and to keep in touch with the customers. That's why we've designed Wiremo Conversations. Below, in this tutorial, we will try to explain why this feature is so important to use and how to do it.
Using ARR (Automated Review Request) is crucial if want to get more and more customer reviews, but much more important is to understand which campaign worked better. When is the conversion better, at the first email request or the second one? Below we will explain to you how to use, read and understand Wiremo ARR statistics.
ARR statistics - as easy as pie
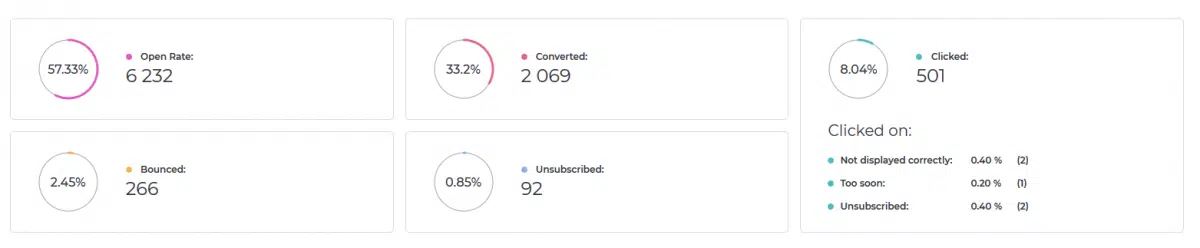
The image above is a screenshot from a real and running ARR campaign, provided by one of our customers - Barefut. Below we will describe every chart in it.
As you can see, there are some tabs. Every tab shows you the statistics using the same type of charts, but with different data.
Total sent - General stats about the current campaign. It includes all the emails that were sent including all reminders.
Sent (no reminders) - refers only to the first review request emails.
Sent (reminder 1) - refers only to the first reminder (if it was configured).
Sent (reminder 2) - refers only to the second reminder (if it was configured).
The charts in the tabs have the same design; the only difference are statistics.
We already mentioned that all the tabs are using the same type of charts. That's why we will explain to you what the charts show using the first tab. It is the main and general report.
Choose the period
It is essential to have the possibility to understand how the campaign worked in different periods. Here you can select the period you want. By default, it will show you statistics from all the time, but you can select to see it for "Today", "Yesterday", "Last Week", "Last Month" or select a custom one using the calendar. If you want to get back and see stats for all period press on the "Default" button.
Total Rate Chart
The main chart shows the total rate in a visual way and percents. This way you can get the first impression if the campaign works well or there is something wrong. Here you can see:
Open rate - Email open rate is the percentage of the total number of people who opened an email from the current ARR.
Clicked rate - is the percentage of people who click on one of the elements from the email like the links "Not displayed correctly", "Too soon", "Unsubscribe" or your logo, product image or stars for the on-landing template. It is also important to understand that this rate is related to the opened emails.
Bounced - is the percentage of email addresses in your email list that didn't receive your review request because it was returned by a recipient mail server.
Converted - is the percentage of your customers who wrote a review.
Unsubscribed - the percentage of people who opt out from the current ARR, these customers won't get any review request emails anymore.
In the center of the main chart, you can see the total number of emails that were sent (it includes reminders and resent emails).
Detailed stats - The devil is in the detail
From the total rate chart, you can find general info in percentage, but it also essential to know the exact number of every of this percent. Below the total rate chart and the calendar you can find detailed statistics about the exact number of email that was opened, bounced, converted, unsubscriber and clicked. Also, we've designed a unique chart for the clicked email rate. You can find the exact number of emails for the links in email - "Not displayed correctly", "Too soon" or "Unsubscribe".
Important:Due to the fact that all the click stats was merged before 03/01/2019, the stats for Sent reminders 1 and 2 are unavailable for the ARR campaigns created before 03/01/2019. Starting this date all the email clicks will be noted separately and shown in the new statistics design.
If you have any question regarding ARR stats, don't hesitate to contact our support team. Thank you for choosing Wiremo.
Nowadays it is very important for online businesses to get, show and share customer reviews. And while it is much easier to show and share the reviews, when it comes to getting reviews it becomes a problem. The biggest challenge is that usually when there are some problems with the product they bought and want to leave a bad review. But what’s with all happy customers? If a client likes something, he will be enjoying it in silence.
Well, how to get reviews after every purchase? The answer is Automated Review Request from Wiremo. Below we will explain how to setup and use it.
Setup Wiremo
It’s easy as pie. All you have to do is to start a free trial. You can test all the features for 14 days.
After that find the detailed setup tutorial for your platform on oursupport page. Setup the plugin or widget and once it is setup properly, you can follow the steps below.
Create an email template
Before starting to ask your customers for reviews you should create and adjust an email template. With Wiremo you can create 2 types of emails: in-email and on-landing. The main difference between them is that in the first type the customers will have to select a rating, write the review and submit it directly in email without leaving it. In the second type, customers click on the rating and then are redirected to the landing page with your logo and Wiremo widget where they can write the review and submit it. The widget will auto-login your customer.
Also, there are some very important settings like:
On which day after purchase to send emails;
How many times to ask a customer for the review;
How to ask the customer that bought more than one product at a time;
And so on...
Please pay attention to all of them. It is very important not to overdue with the requests, because it could annoy your clients and they will provide you with bad reviews for this, instead of an objective and good review. We recommend to use one reminder.
Now once your template is ready it’s time to start the ARR.
Start Automated Review Request
If your site is on WooCommerce or Squarespace, you probably already installed the Wiremo plugin for your platform, so all you need to do is check these tutorials:
Once you’re done all you have to do is to wait for reviews to moderate them.
Other platform users can also setup and start the Automated Review Request. For this, you’ll need to submit a ticket in your dashboard to our support team to provide you the access to API.
Note:Access to API is available only for our Professional and Premium Plan users.
Work with stats
And the final and also important step is to work with stats. Once started, every ARR campaign will provide you information about how many emails were sent, opened, clicked, converted, bounced and so on.
It is very important to check all this. Sometimes, for different regions and business models, the in-email or on-landing requests works differently. Periodically, you should make some tests campaign with different email templates, different subject and text (the subject in email is very important), to find the best working campaign for you.
All these elements will help you get more and more customer reviews and increase your customer loyalty, improve SEO and finally get more sales and money.
Usually, business owners want to use the business name instead to the First and Last name in widget and notification emails. Below we will explain to you how to adjust these settings.
Use business name instead First and Last Name
This setting will enable the use of the business name in the widget and in notification emails. To set up your business name simply login to your Wiremo Dashboard, then go to Customize ⇒ App Configuration. Now in the "Configure your widget" block type the name wish in the "Business name" input box (pin 1). Please don't forget to scroll down and press the "Save" button. Below you can see some screenshot of the customization, provided by one of our customers.
Now go to your website and open the page where you've set up the Wiremo widget. In the widget, press on your profile image (pin 2) and select "View profile" (pin 3)
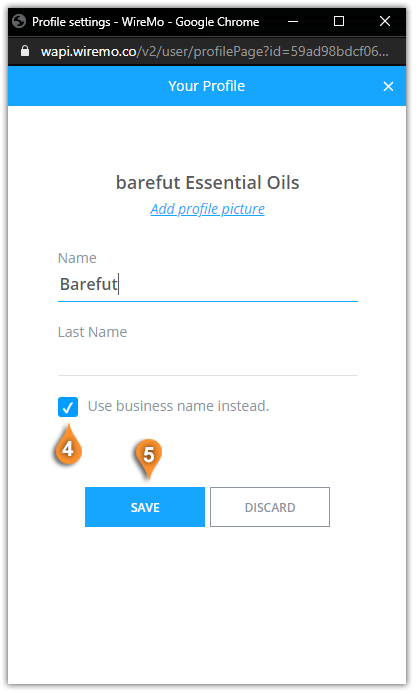
In the Profile settings window just press on the checkbox "Use business name instead." (pin 4) and then press the "SAVE" button (pin 5).
It's our great pleasure to announce the official launch of a new and very useful feature - Multiple User Roles. If you have more than one website, then you need much more time to moderate your reviews. Now, with this great new feature, you can delegate these responsibilities to your coworkers. In this post, we will show you how to add new teammates.
We are proud, and it's our great pleasure to announce the official launch of a new and great feature - Questions and Answers (Q&A) for our customer reviews widget. In this post, we will show you how to set it up and get the maximum out of it.
Welcome to Wiremo! We know that many of you had a lot of past orders before start using Wiremo. That's why we've created the possibility to ask your past orders for review. Below we will explain to you how to set up a Review Request campaign for your past orders in the Wiremo plugin for WooCommerce.
Video tutorial
For an easier way to use Wiremo Past Orders Review Request on the WooCommerce website, you can watch the following video tutorial or follow the steps below it.
Note:If you are using ARR for past orders, it is essential to know that we take all the information and the product ID itself from the order form. If you deleted that product and created a new one back, the review for the old product will not appear on the new product. Is not a lost review, you can migrate it.
For an easier way to use Wiremo Automated Review Request on WooCommerce, you can watch the following video tutorial or follow the steps below it.
Automated Review Request
Important:To enable and use Automated Review Request with Wiremo plugin you should create an email template in Wiremo Dashboard. Go to Wiremo Dashboard, then in main menu go to Review Request, then select Automated RR and press the "New Template" button. For more details please read this tutorial: How to create an email template for automated review request
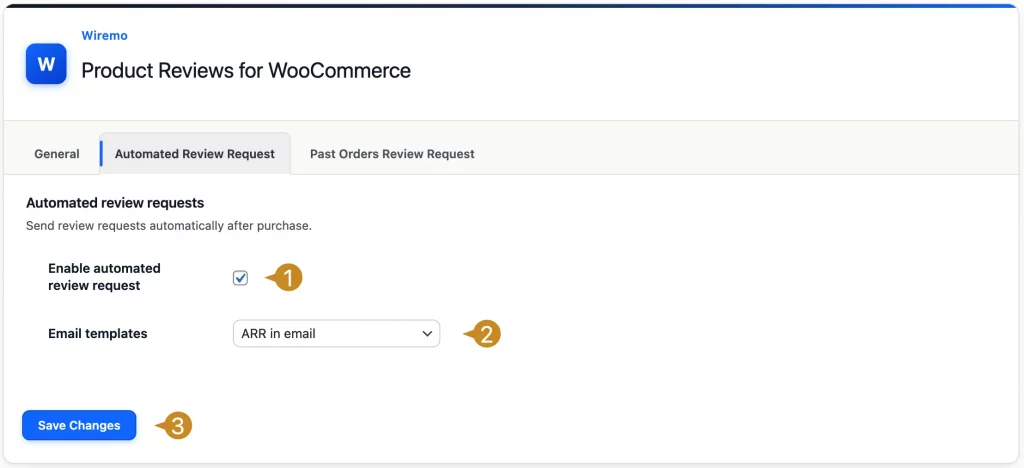
With Wiremo you can fully automate the process for review requests after purchase. The review request action will take place only for orders with status completed. Once you've created a template in the Wiremo dashboard, you have to complete the next points in our plugin for WooCommerce:
Check the box for "Enable automated review request" (pin 1)
Choose the email template name that you've created in Wiremo Dashboard (pin 2)
Press the "Save Changes" button (pin 3).
Statistics
Once you've started your Automated Review Request campaign, you can find detailed stats in Wiremo Dashboard:
Go to Dashboard -> Review Request -> Automated RR, find your template, and click on it.
How to Exclude products from the Automated Review Request Campaign.
You can exclude products from your Automated review request campaign, and here are the steps:
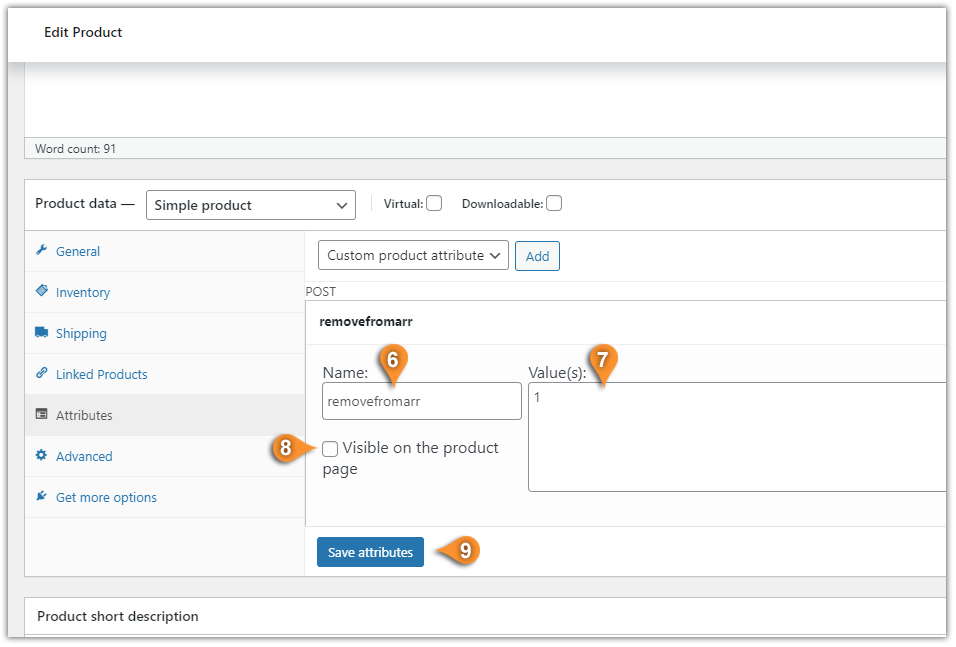
1. Go to your wp-admin dashboard, go to Products (pin 1) -> All Products (pin 2), select and edit the product for which you do not want to send a review request email to your customers after purchase (pin 3).
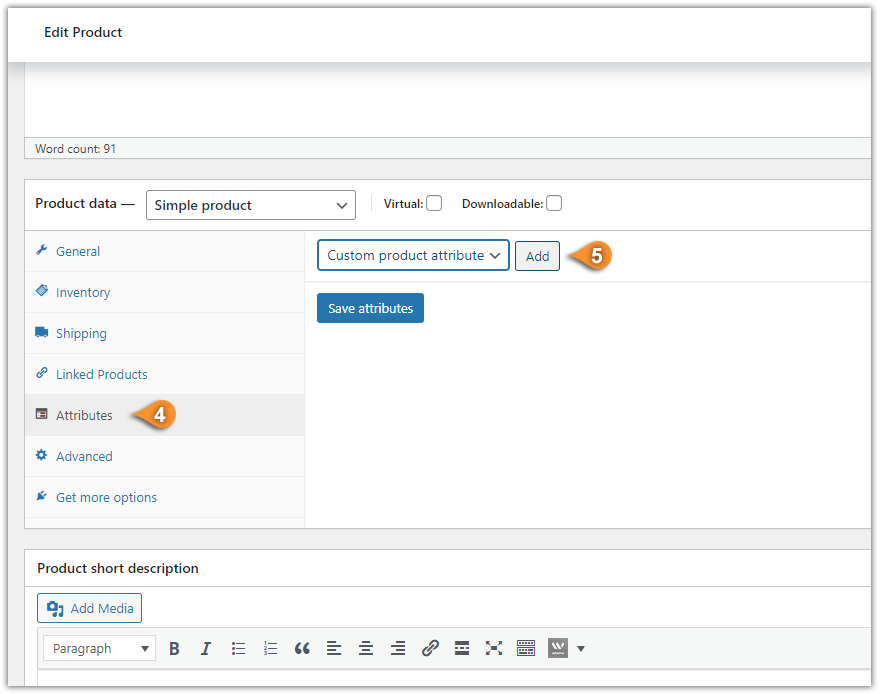
2. On the product page edit mode, scroll down and find "Attributes" (pin 4) and click on the "Add" button (pin 5) to add a custom attribute.
3. For the attribute Name (pin 6) type: "removefromarr", for the Value(s) (pin 7) type: "1", next, uncheck the "Visible on the product page" (pin 8) and click on the "Save attribute" (pin 9).
Important:For the products for which you are adding the custom attribute: "removefromarr" will be Excluded from the Automated Review Request Campaign.
The Attribute "removefromarr" will work only for the Automated Review Request, and not for the Past Orders Review Request campaign.
Welcome to Wiremo! We know that many of you had a lot of past orders before start using Wiremo. That's why we've created the possibility to ask your past orders for review. Below we will explain to you how to setup a Review Request campaign for your past orders in Wiremo plugin for Squarespace.
Important:1. To use Past Orders Review Request you should have a “Commerce - Advanced” Squarespace plan.
Note:If you are using ARR for past orders, it is essential to know that we take all the information and the product ID itself from the order form. If you deleted that product and created a new one back, the review for the old product will not appear on the new product. Is not a lost review, you can migrate it.
Video tutorial
For an easier way to use Wiremo Past Orders Review Request on your Squarespace website, you can watch the following video tutorial or follow the steps below it.
Start Past orders review request campaign in the Squarespace plugin
Create and paste a Squarespace Orders API key to the "Squarespace Orders API key" field (pin a). Below, in this tutorial, you can find how to create a Squarespace Orders API key in your Squarespace Dashboard.
Choose the Start date (in the past) of the period of the past orders that you would like to ask for reviews (pin b)
Also, select the end date of the period (pin c)
Once you've selected the period, our plugin will show you how many orders have been selected for review request (pin d).
You can send your emails gradually by choosing the emails number in "Emails per day" option (pin e)
Choose the Email template name that you've created in Wiremo Dashboard (we recommend to create a separate template for past orders review requests) (pin f)
To start the campaign press on the "Start ARR campaign" button (pin g)
Note:Start date can be any day in the past. Also there are no limits for past order number or time period.
Once your campaign is started you can see some basic information regarding the emails to be sent in the table below the ARR settings. All the emails will be sent according to your Review Request Template settings and gradually as you've set up in the "Email per day" setting. Detailed statistics of your campaign you can find in Wiremo Dashboard.
Create a Squarespace Orders API key
To create a Squarespace Orders API key, please log in to the Squarespace dashboard and go to "Settings -> Advanced -> Developer API Keys". Then press the "GENERATE KEY" button (pin 1).
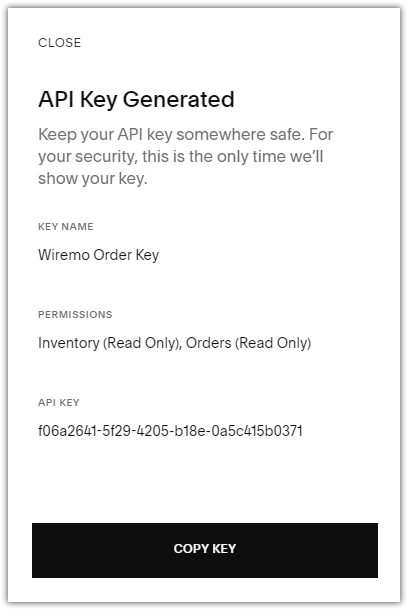
Now type a name for your key, for example, "Wiremo Order Key" (pin 2) and tick on the "Inventory" and "Orders" checkboxes. Then select the “Read Only” option for both of them (pin 3 & pin 4).
Then scroll UP and click on the "GENERATE KEY" button (pin 5).
In the next window copy the created key and paste it in the Wiremo Squarespace plugin.
Note:To keep your data secure, you won’t be able to access this key again once this dialog is closed.
Exclude products from the Past Orders Review Request campaign
Important:You can exclude specific products from your Past Orders Review Request campaign by using the Exclusions option in the Wiremo plugin for Squarespace. For more details please check this tutorial:
It is our great pleasure to announce the official launch of our new feature - Additional Questions for our customer reviews widget. In this post, we will show you how to setup and get the maximum out of it.
Hi! In this short tutorial, we will explain you how to change your credit card details in Wiremo Dashboard.
Change credit card details
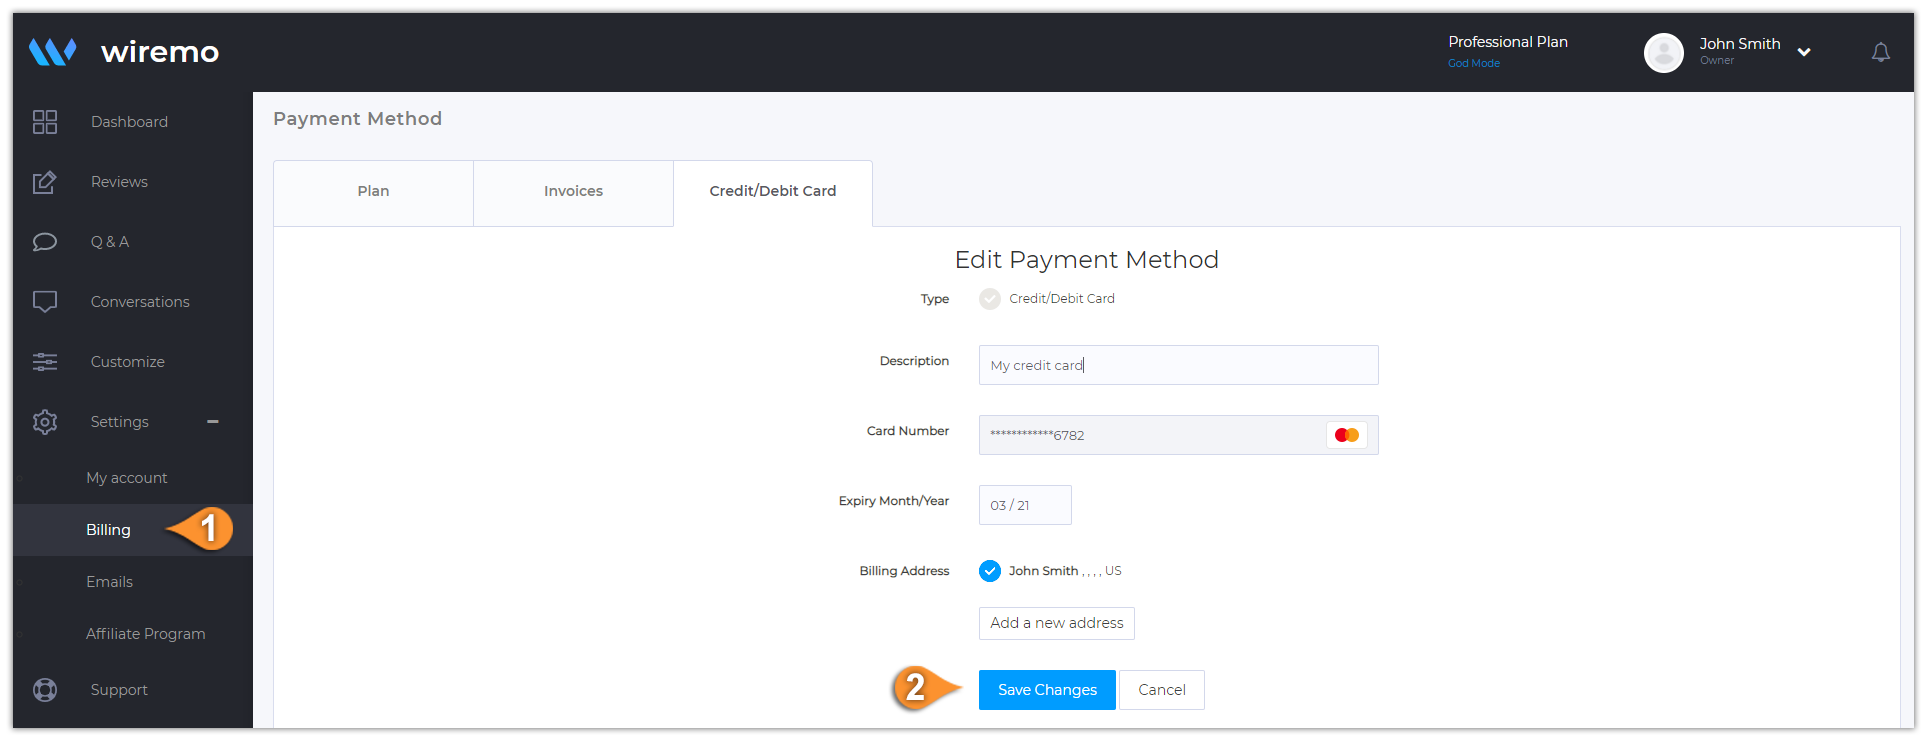
To change your credit card details, please login to your Dashboard, then go to “Settings” access the “Billing” tab (pin 1) and there click on the “Credit/Debit Card” tab. After you are done with updating your Credit/Debit Card details, on the bottom of the page you will find “Save Changes” button, click on it!
Hi! In this short tutorial, we will explain you how to find all the email that you've got from Wiremo.
How to find the emails
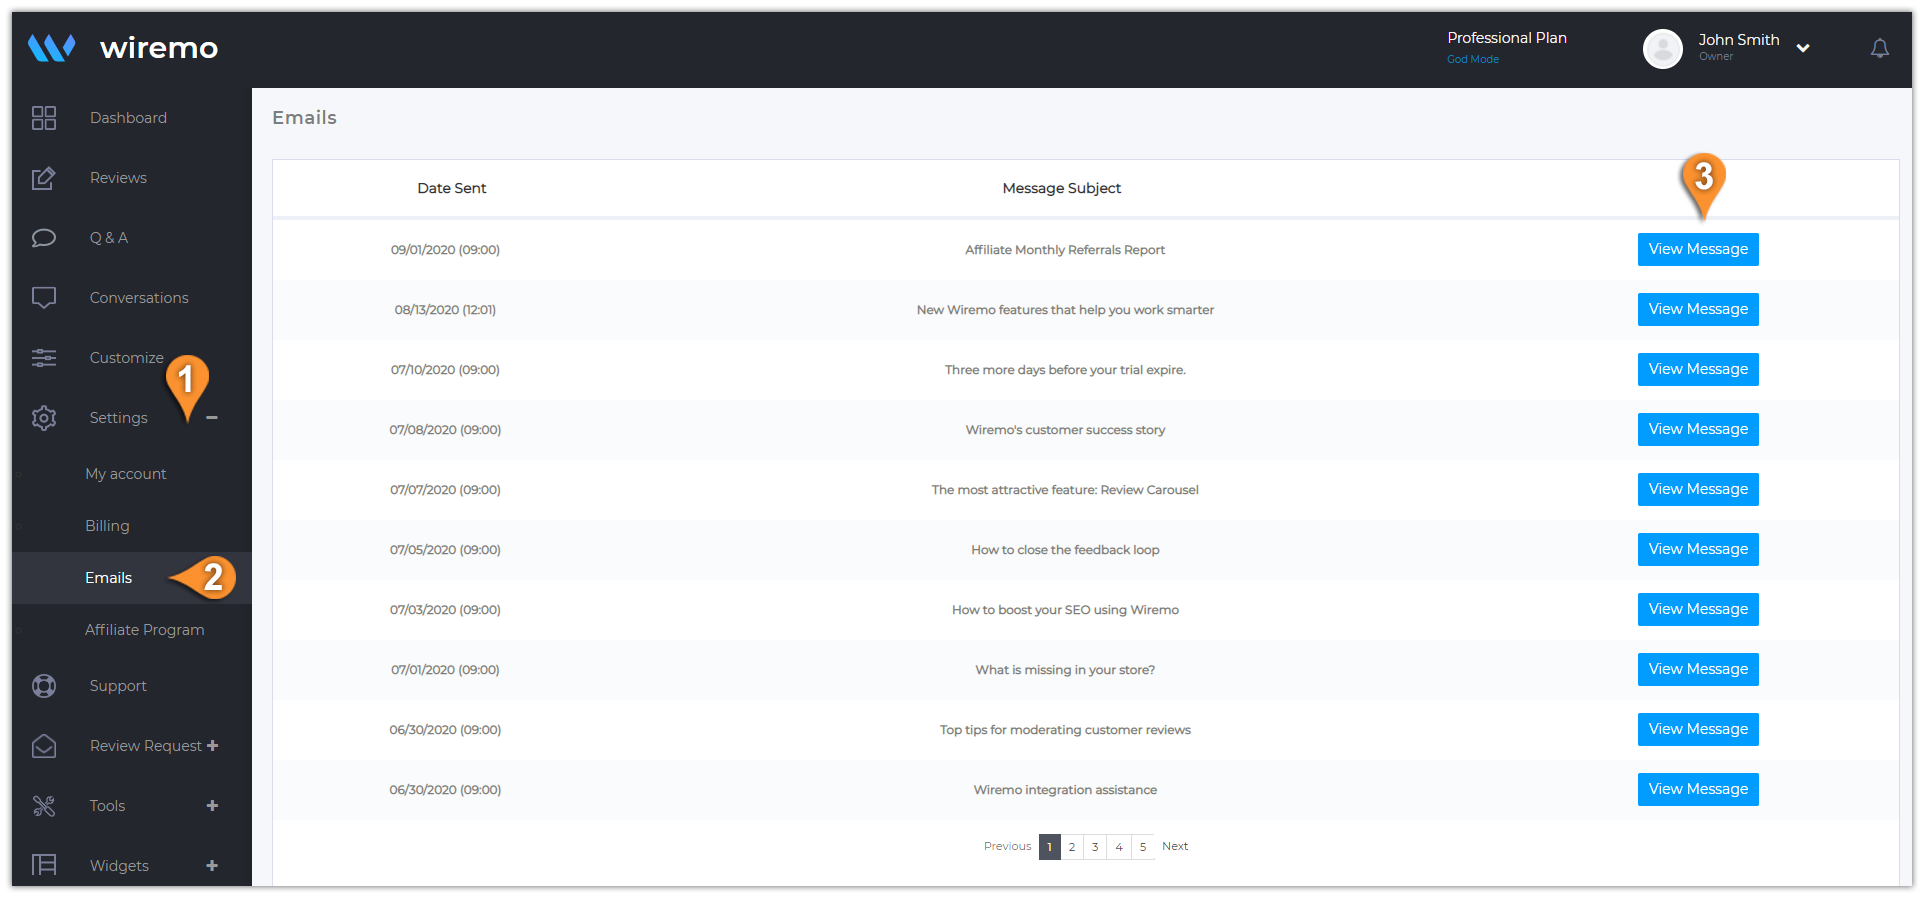
To find our emails, please login to your “Dashboard”, then go to “Settings” (pin 1) and there click on the on the “Emails” (pin 2). There you can find all the emails sent to you:
Hi! In this short tutorial, we will explain you how to change the number of customer reviews displayed per a pageview.
Change the number of reviews per pageview
To change the number of reviews per a pageview, please login to Wiremo Dashboard, go to "Customize" (pin 1), then choose the "App Configuration" section (pin 2).
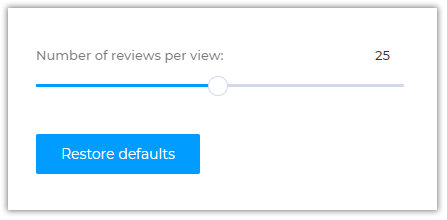
Scroll down and find the slider “Number of reviews per view:”. Move the cursor and select the desired number of reviews per a pageview, then click on the “Save” to save the changes.
That's all. Now you're done! Thank you for choosing Wiremo.
Hi! In this short tutorial, we will explain you how to find your customer reviews for a specific product.
How to find specific product reviews
To find specific product reviews, please login to your Wiremo Dashboard, go to “Reviews” (pin 1). Here in the "Select product" drop-down list (pin 2), you can select the product (pin 3) you want to see the reviews for.
Hi! In this short tutorial, we will show you how to remove Wiremo branding from the widget.
Note:Please note that this option is available only for our Professional and Premium plan users.
How to remove Wiremo branding
To remove Wiremo branding, please log in to Wiremo Dashboard, go to "Customize" (pin 1), then choose the "App Design" section (pin 2) and click on "General Settings" (pin3).
Now in "General settings" find the option "Wiremo branding" (pin 4) and disable it.
Hi! In this short tutorial, we will show you how to automatically accept reviews for a specific rating.
How to accept review automatically
To accept reviews automatically, please login to Wiremo Dashboard, go to "Customize" (pin 1), then choose the "App Configuration" section (pin 2).
Now in "App Configuration" scroll down, find the option "Auto-approve reviews" (pin 3) and enable it.
Once you enable the "Auto-approve reviews" option, a new addition setting will appear - "Auto-approve reviews with:" (pin 4). This option provides you the possibility to choose the specific rating for reviews you want to accept automatically. Select the rating you want and then press the "Save" button.
Note: The app will auto accept reviews starting with the rating you choosed to the highest one. For example if you selected rating 3, then the app will auto accept reviews with 3, 4 and 5 stars.
That's all. Now you're done! Thank you for choosing Wiremo.
Hi! In this short tutorial, we will explain to you how to hide your reviewer's last name in the widget.
How to hide last name in reviews
To hide the reviewer's last name, please log in to Wiremo Dashboard, go to "Customize" (pin 1), then choose the "App Design" section (pin 2) and click on "General Settings" (pin3).
Now in the "General settings" find the option "Hide last name" (pin 4) and enable it.
That's all. Now you're done! Thank you for choosing Wiremo.
Hi! In this short tutorial, we will explain you how to submit a ticket in Wiremo Dashboard.
Submit a ticket
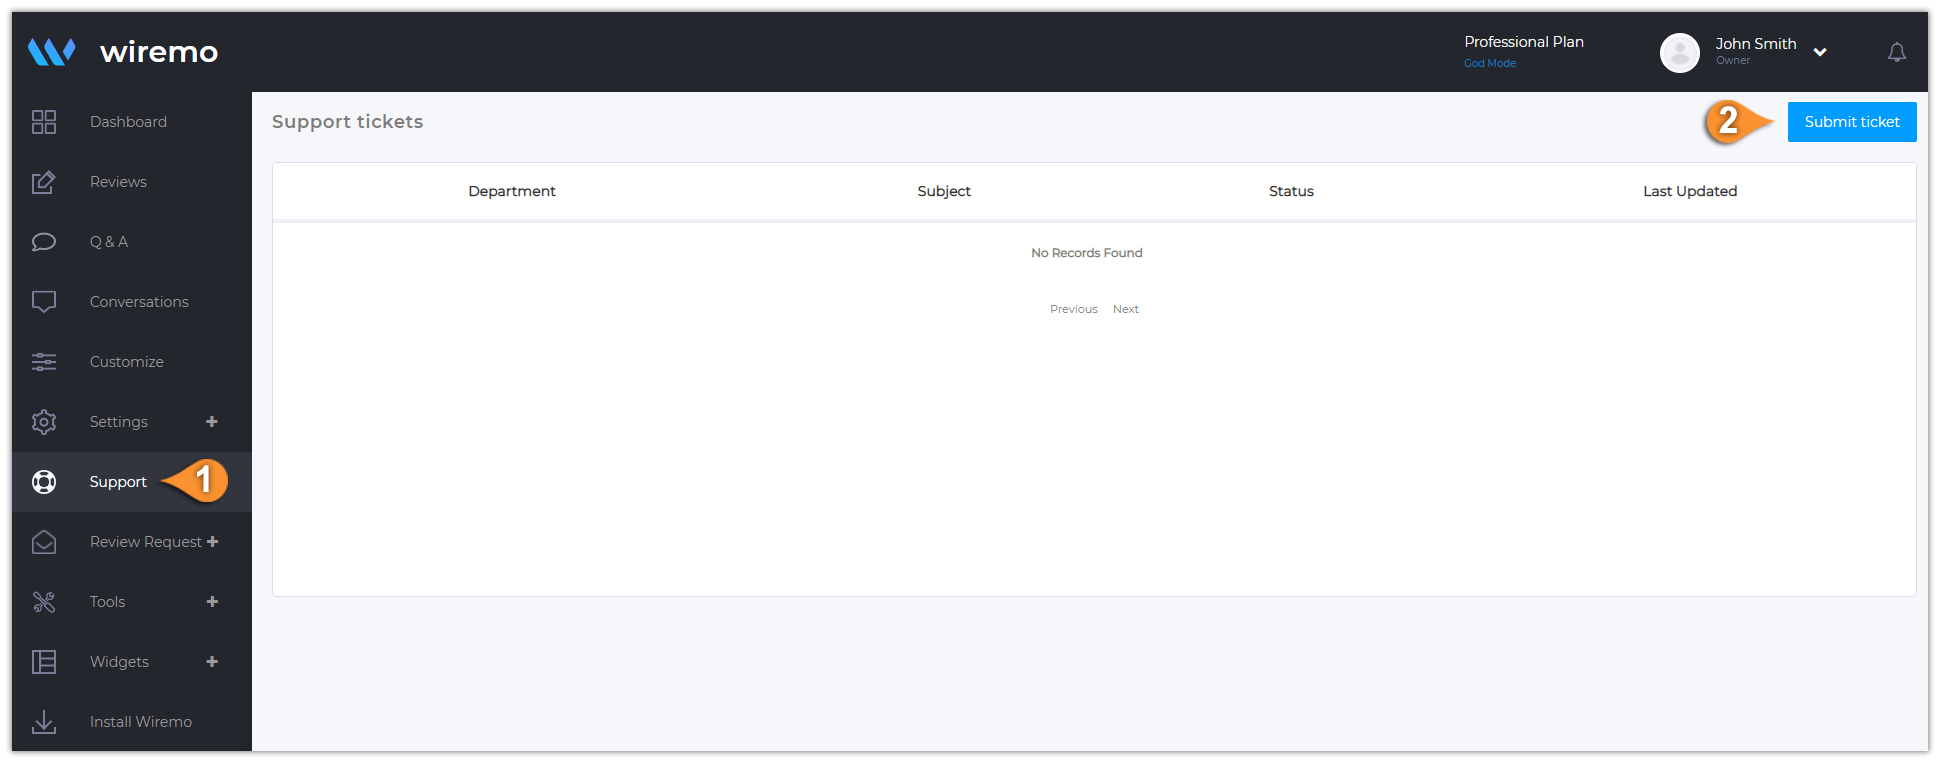
To Submit a ticket, please login to Wiremo Dashboard, go to “Support” (pin 1) and then press the “Submit ticket” button (pin 2).
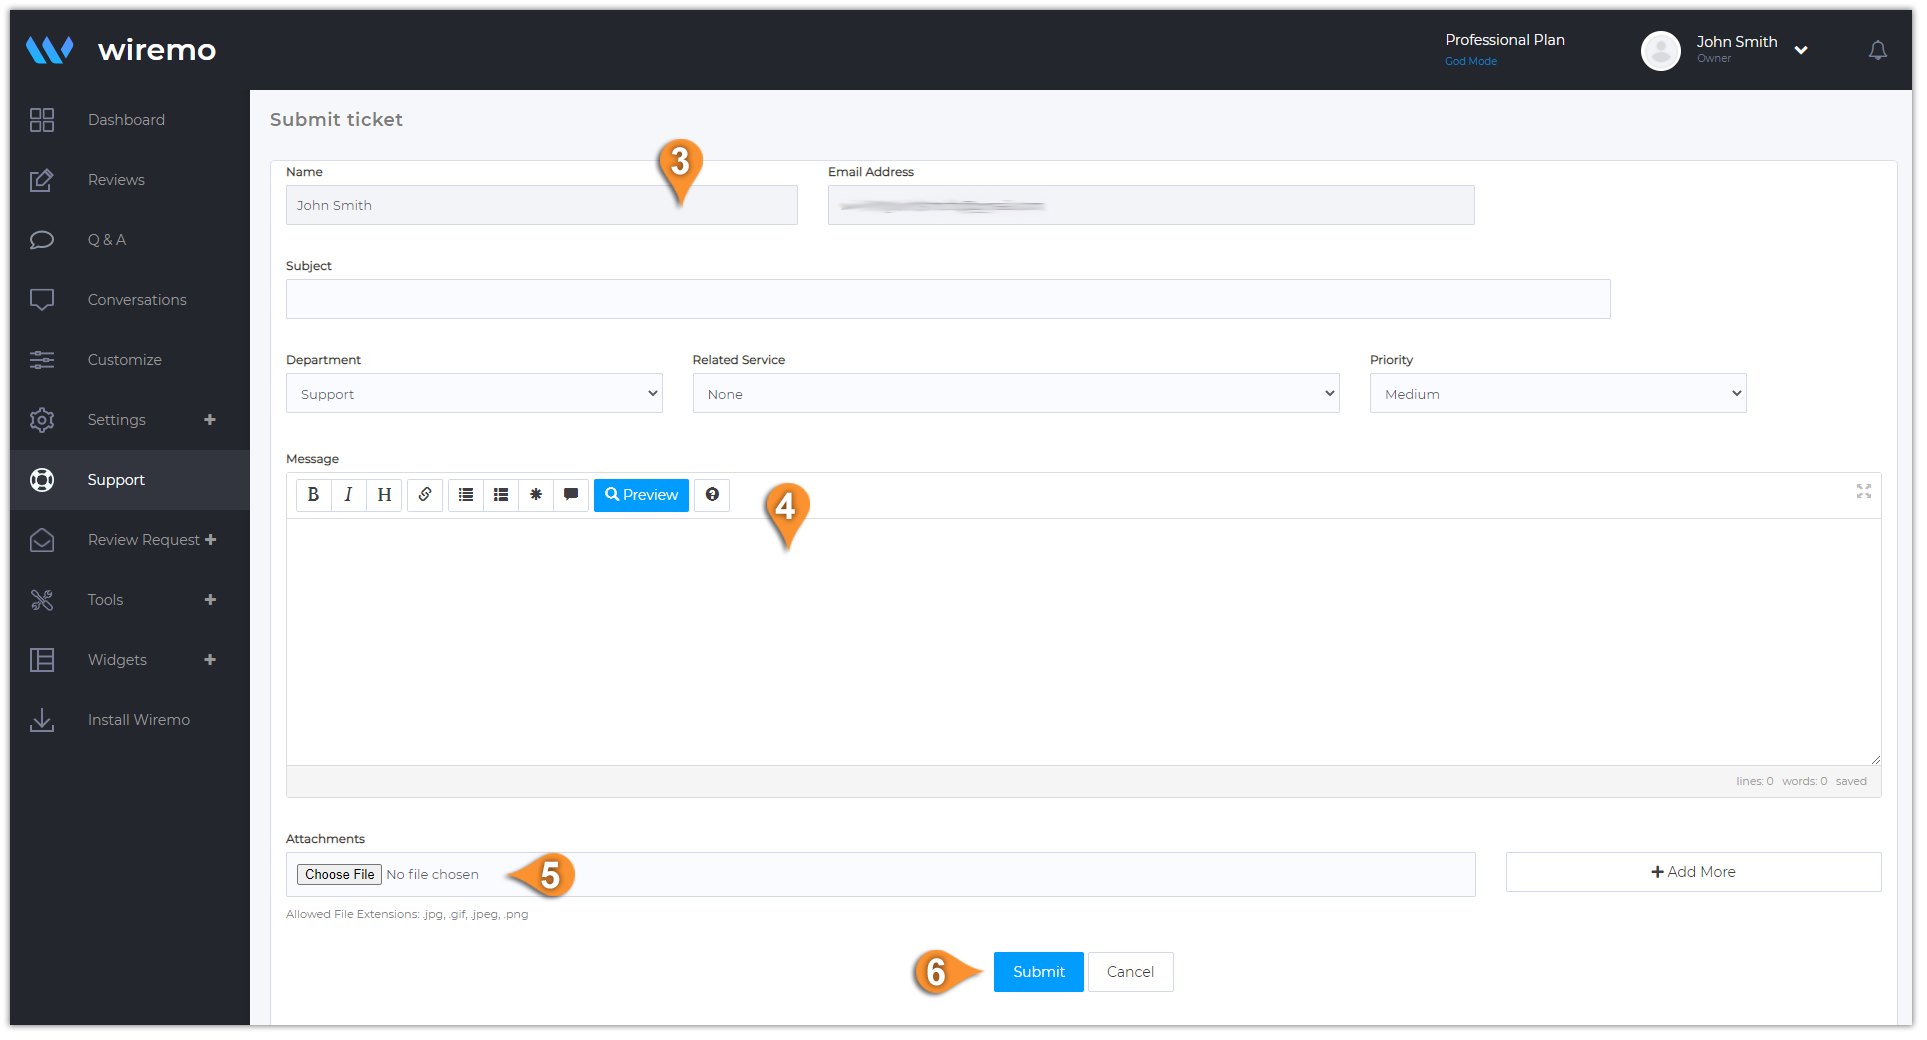
On the next page, please add all the required information (pin 3): your “Name”, “Email Address”, “Subject”, “Urgency” type, “Department” and “Related Service”. Then type your message (pin 4). You can also attach some files if it's needed (pin 5). Once you're done, just click on the “Submit” button (pin 6).
Hi! In this short tutorial, we will explain you how to change your password in Wiremo Dashboard.
Change account password
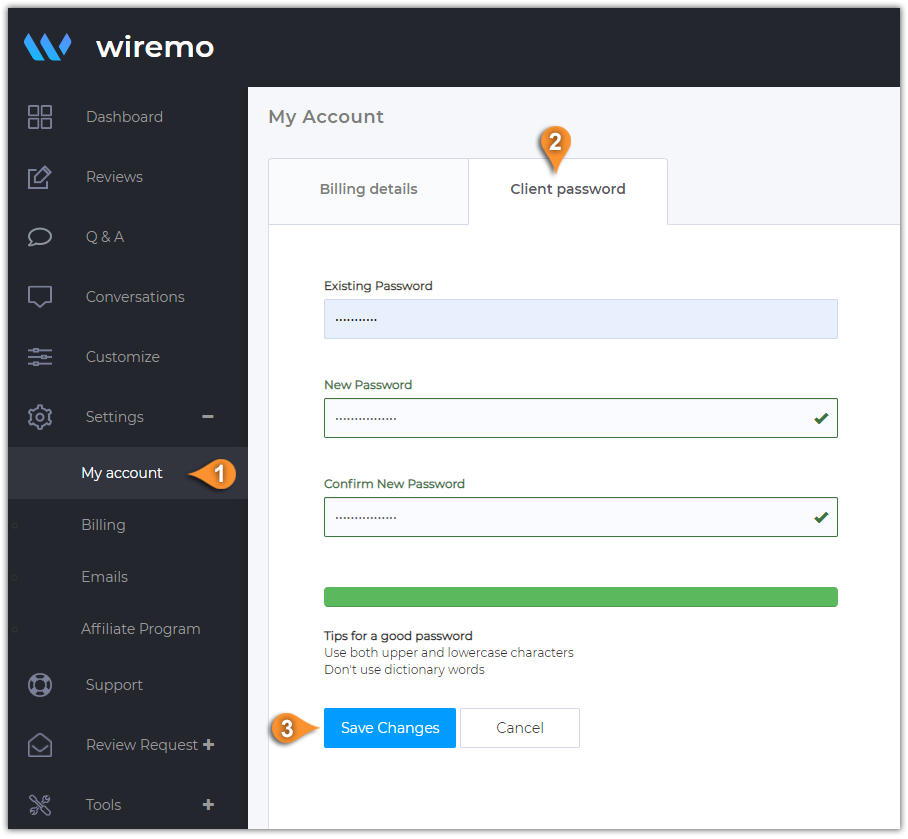
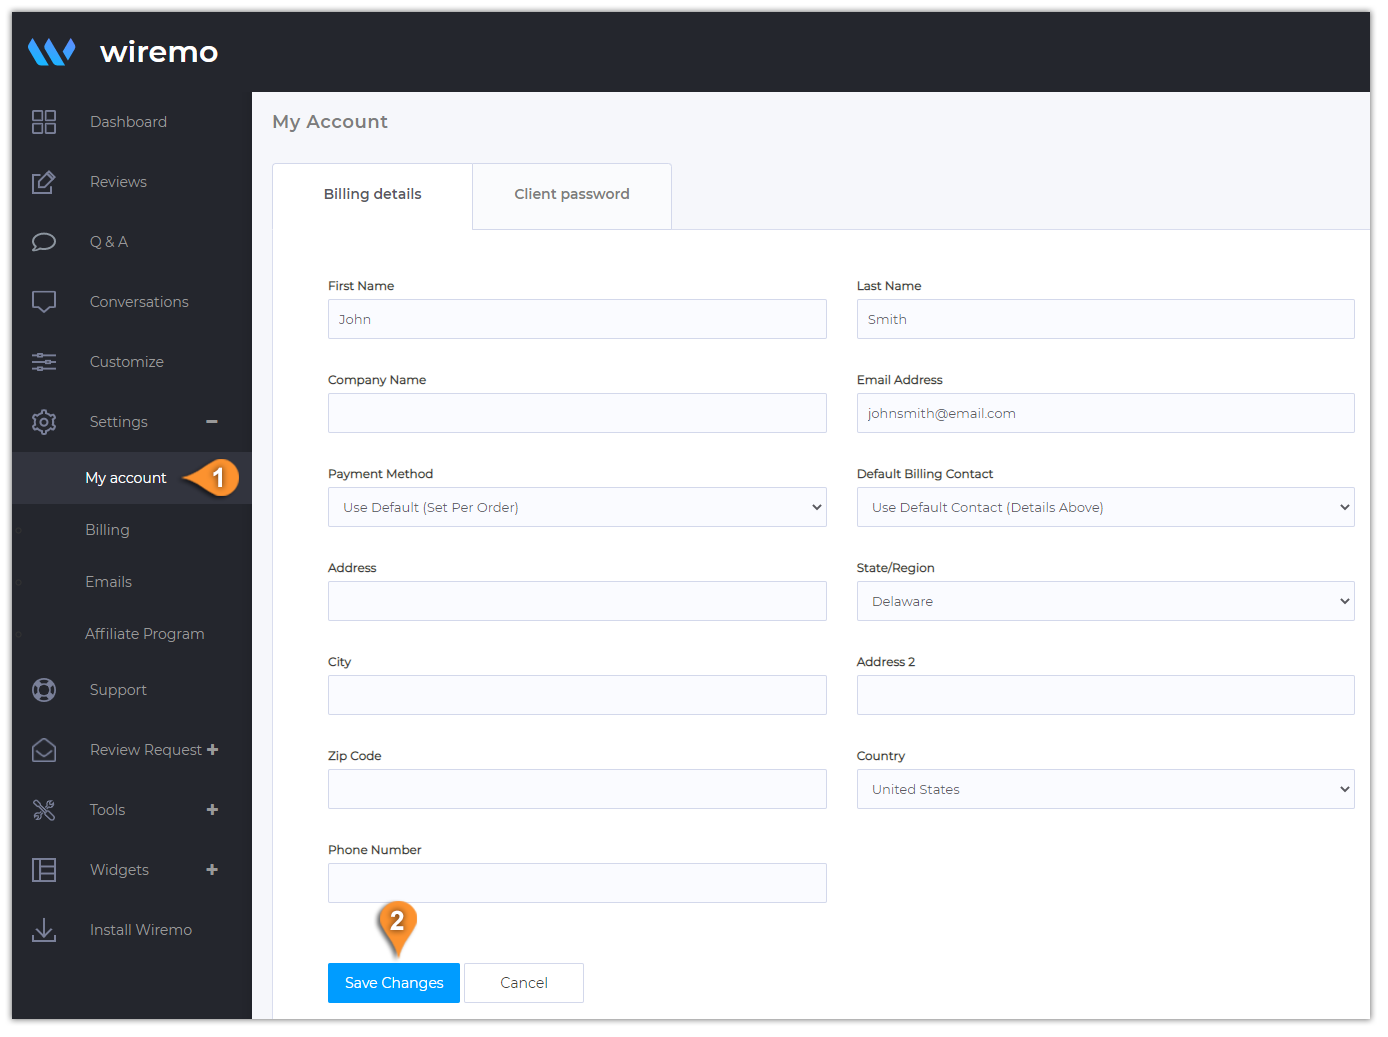
To change your account password, please login to Wiremo Dashboard, go to “Settings” and then click on “My account” (pin 1). Now, press on the "Client password" tab (pin 2). In this tab, you can change your password. Type the existing, then the new one and confirm it. Once you're done press “Save Changes” button (pin 3)!
Hi! In this short tutorial, we will explain you how to update your billing details in Wiremo Dashboard.
Update billing details
To update your billing details, please login to Wiremo Dashboard, go to “Settings” and then click on “My account” (pin 1). Now, in the "Billing details" tab you can fill out your billing details!
If you also want to change your account password, you can do it from the same section. Just go to the “Client Password” tab, enter your current password, then your new one, and click “Save Changes.”
Once you are done with updating your billing details, press the “Save Changes” button (pin 2).
Hi! In this short tutorial, we will explain you how to pay your invoices in Wiremo Dashboard.
Note:Please make sure you have updated your billing details before paying the invoice!
How to pay an invoice
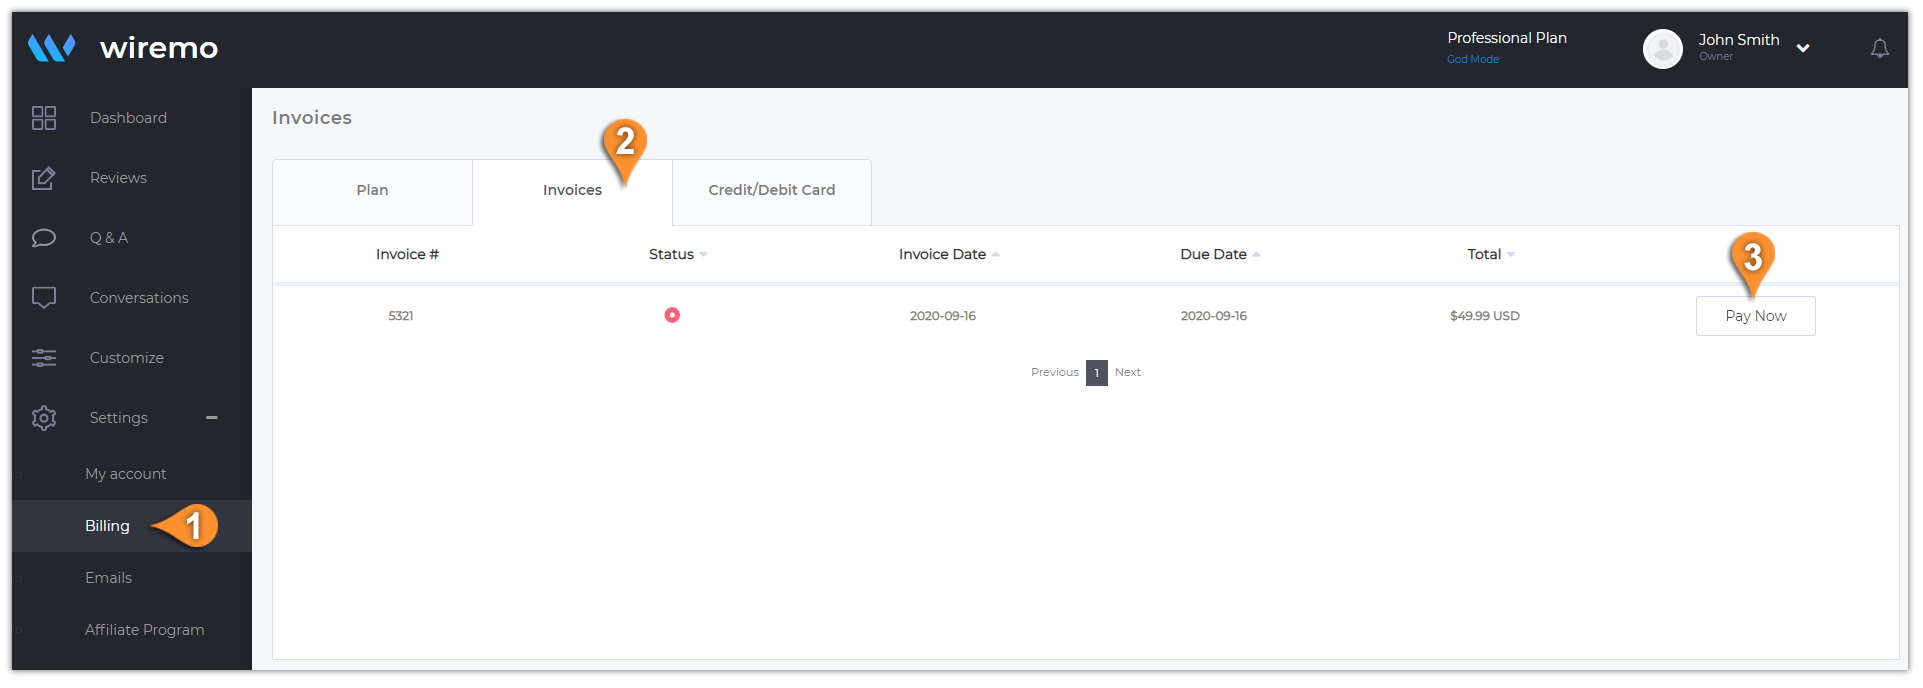
To pay an invoice, please login to Wiremo Dashboard, go to “Settings” and then click on “Billing” (pin 1). Now click on “Invoices” tab (pin 2). Find your unpaid invoice and press on the "Pay Now" button (pin 3).
If you already have a card saved to your dashboard you can use it, or you can select to use a new card and submit the payment.
To upgrade your plan, please login to Wiremo Dashboard, go to “Settings” and then click on “Billing” (pin 1). Now click on the “Upgrade” button (pin 2)
If you have a promo code related to one of our special offers please paste it in the input box "Promotional Code" and then press the "Validate Code" button. Once it's done just press the "Click to Continue" button.
Note: The updated price you will see once you'll press the "Click to Continue" button.
Hi! In this short tutorial, we will explain you how to accept, reply, decline or mark as pending your customer reviews.
Moderate in the reviews tab
To moderate your reviews you need to login to your Dashboard and click on the “Reviews” tab (pin 1) in the main menu. You can accept, decline, reply, open a conversation ("Reply as ticket"), migrate reviews, delete or change the status without opening the review. Now there are 3 ways to moderate reviews:
You can select one or more reviews (pin 3) or you can select all of them (pin 2). Once the reviews are marked as selected just choose the desired action in the opened blue menu (pin 4).
You can use the setting gear for every review.
Also, you can use the drop-down menu with the options for all your reviews (pin 5).
Moderate using the settings gear
As you can see from the screenshot below you have a lot of settings for every review:
Mark as pending - Only you as admin can see the review
Decline
Reply - Write feedback to the review you've got.
Mark as Verified
Mark as Unverified
Reply as ticket - open a private conversation with your customer
Deleted reviews will be marked with a black circle status (pin a).
Deleted reviews can be restored within 48 hours. This option is available only for our Professional and Custom Plan users.
If you want to find or hide your recentely deleted reviews just use the Status Filter (pin b) and tick the Deleted Status (pin c). Then press the "Apply" button.
Moderate all reviews
The option to moderate all reviews also includes all actions related to a review, except open a conversation. But also here is an important option to export all your customer reviews to a CSV file. You can find out more information in our dedicated tutorial - How to export customer reviews.
Moderate in the review page
For more options, you need to click on your review to open it. Once you're in, you will have 3 main moderation zones. In the top menu (pin 7) you can approve a review if it's pending or vice versa, decline, ask to update, or delete the current review. The second menu (pin 6) is placed under the review. Here you can reply to the review and edit it if you found some mistakes.
Also an important list of options you can find in the sidebar. Here you can see your customers' info:
First and Last Name
The review source
Email address
GEO source
IP Address
Link to the customer review page source
Identifier
Verified buyer - you can easily mark the current reviewer as a verified customer.
Review sentiment - Using AI you can see what the text is expressing, is it neutral, positive, or negative.
Review Keywords - Using AI find and show the most used words from your latest customer reviews related to the current one.
It sometimes happens that some clients make mistakes when they write a review. This kind of mistake can occur while typing the name, email address, or even reviewing a different product from the one that was bought. You can easily fix all these mistakes without contacting the client, directly from the Wiremo Dashboard. You can correct your client name, email address, link, and product ID. (pin 8). The edit and copy options will appear on hover.
Hi! In this short tutorial, we will explain you how to mark a review with the "Verified buyer" label.
Important:Please note that you can mark as verified only those reviews that were left by people who confirmed their email address. Anonymous reviews or reviews with unverified email cannot be marked as verified.
Video tutorial
For an easier way to find out how to set the "Verified buyer" label, you can watch the following video tutorial or follow the steps below it.
How to set the "Verified buyer" label
So you've got a new review. Once you open it in the dashboard, you can see your review details. First of all, you may note that the email status is marked as "Verified" (pin 1). It means that your customer confirmed the email address. Now to mark this review to as verified, at the lower right corner just enable the "Verified buyer" option (pin 2). After that refresh the page where your review is being displayed and check. It should be marked as verified.
How to ask a customer to confirm email address
If you enabled the "Verify review email" option in your dashboard, then every customer who leaves a review will instantly get a request to confirm the email address. As you already know, to mark a review with the "Verified buyer" label, the reviewer's email should be confirmed. In the image below you can see an example of a review with "Unverified" status. To ask again your customer to confirm email address just press on the "Unverified" link (pin 3).
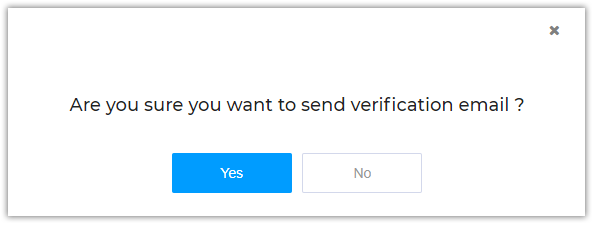
In the opened pop-up window just confirm that you want to send a verification email.
Thank you for choosing Wiremo.
By continuing to use this site you consent to the use of cookies in accordance with our Cookies Policy.