How Wiremo works

Insights and tips for the review community

June 22nd, 2018

How to Accept Reviews Automatically for Specific Ratings

Hi! In this short tutorial, we will show you how to automatically accept reviews for a specific rating.

How to accept review automatically

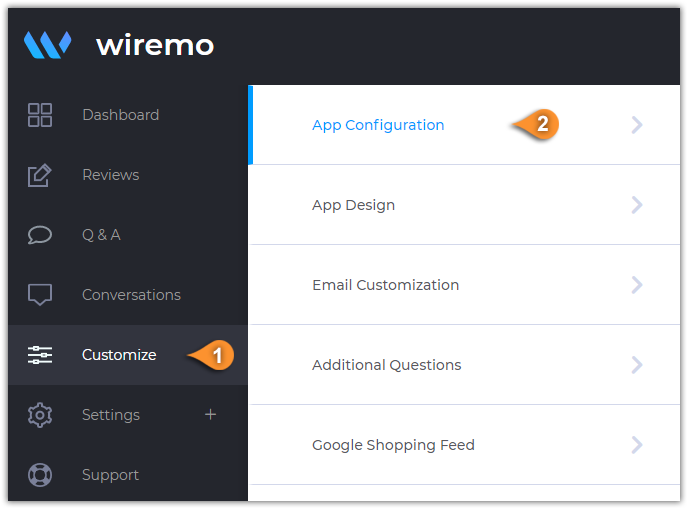
To accept reviews automatically, please login to Wiremo Dashboard, go to "Customize" (pin 1), then choose the "App Configuration" section (pin 2).

How to accept reviews automatically for specific ratings


Now in "App Configuration" scroll down, find the option "Auto-approve reviews" (pin 3) and enable it.

How to Accept Reviews Automatically for Specific Ratings


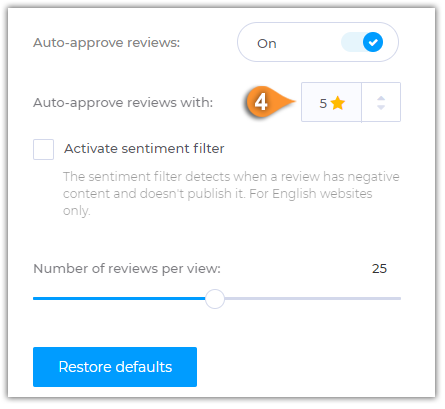
Once you enable the "Auto-approve reviews" option, a new addition setting will appear - "Auto-approve reviews with:" (pin 4). This option provides you the possibility to choose the specific rating for reviews you want to accept automatically. Select the rating you want and then press the "Save" button.

Note: The app will auto accept reviews starting with the rating you choosed to the highest one. For example if you selected rating 3, then the app will auto accept reviews with 3, 4 and 5 stars.

How to Accept Reviews Automatically for Specific Ratings


That's all. Now you're done! Thank you for choosing Wiremo.

June 22nd, 2018

How to Hide Last Name in Reviews

Hi! In this short tutorial, we will explain to you how to hide your reviewer's last name in the widget.

How to hide last name in reviews

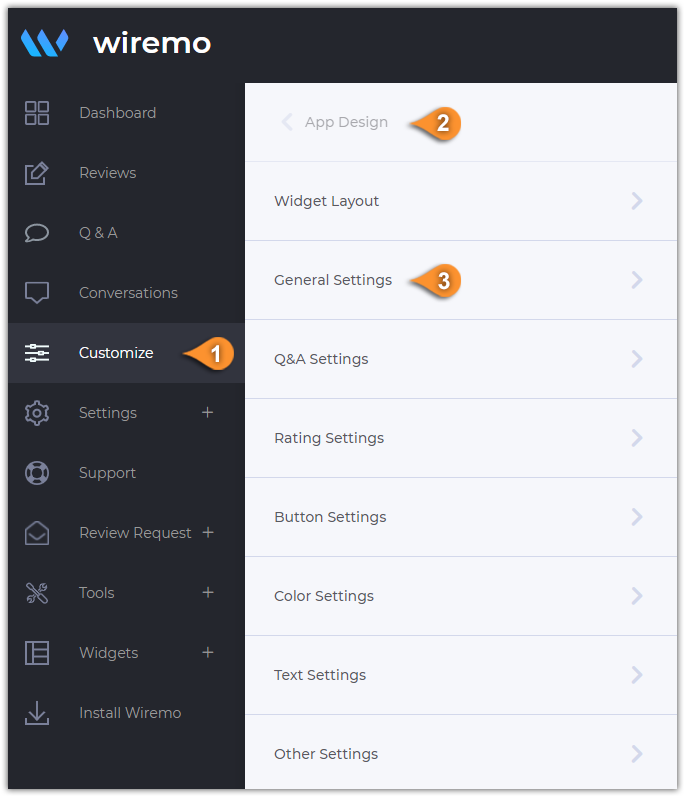
To hide the reviewer's last name, please log in to Wiremo Dashboard, go to "Customize" (pin 1), then choose the "App Design" section (pin 2) and click on "General Settings" (pin3).

How to Hide Last Name in Reviews


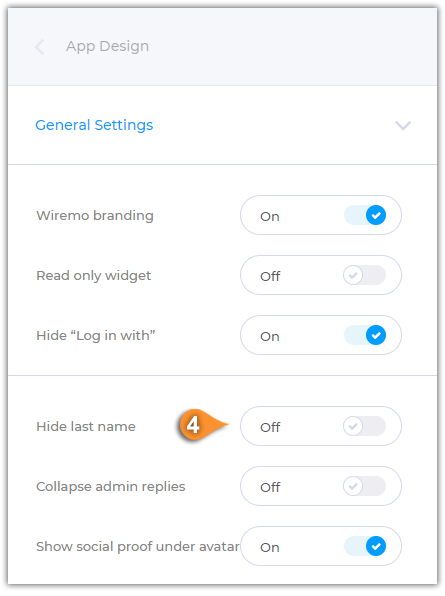
Now in the "General settings" find the option "Hide last name" (pin 4) and enable it.

How to Hide Last Name in Reviews


That's all. Now you're done! Thank you for choosing Wiremo.

June 21st, 2018

How to Submit a Ticket

Hi! In this short tutorial, we will explain you how to submit a ticket in Wiremo Dashboard.


Submit a ticket

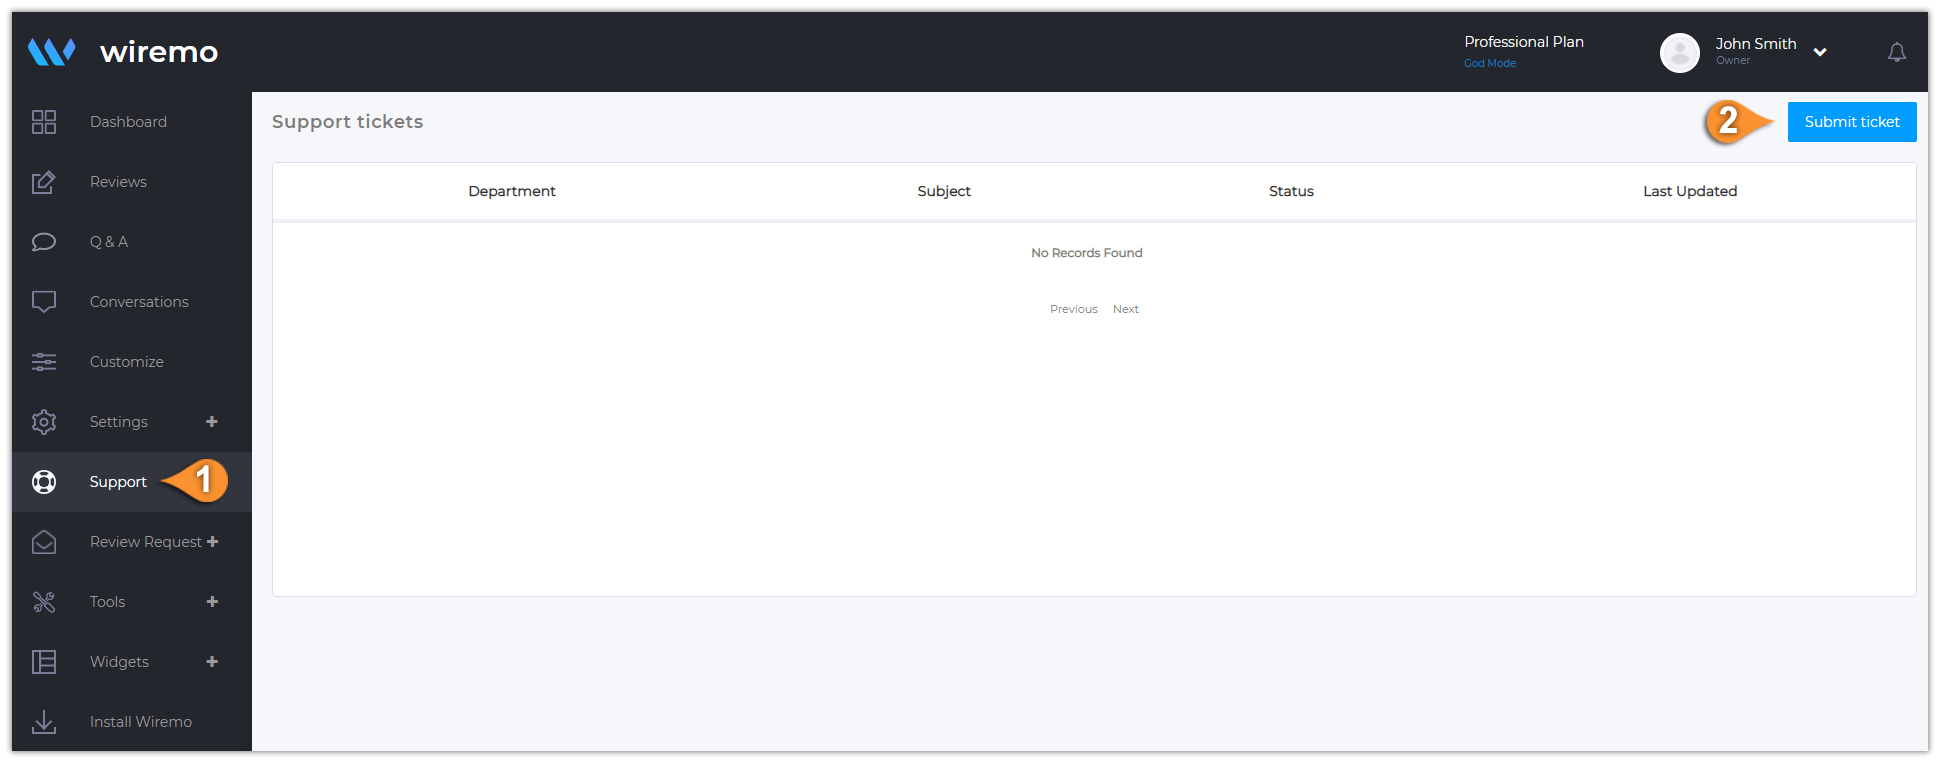
To Submit a ticket, please login to Wiremo Dashboard, go to “Support” (pin 1) and then press the “Submit ticket” button (pin 2).

How to Submit a Ticket


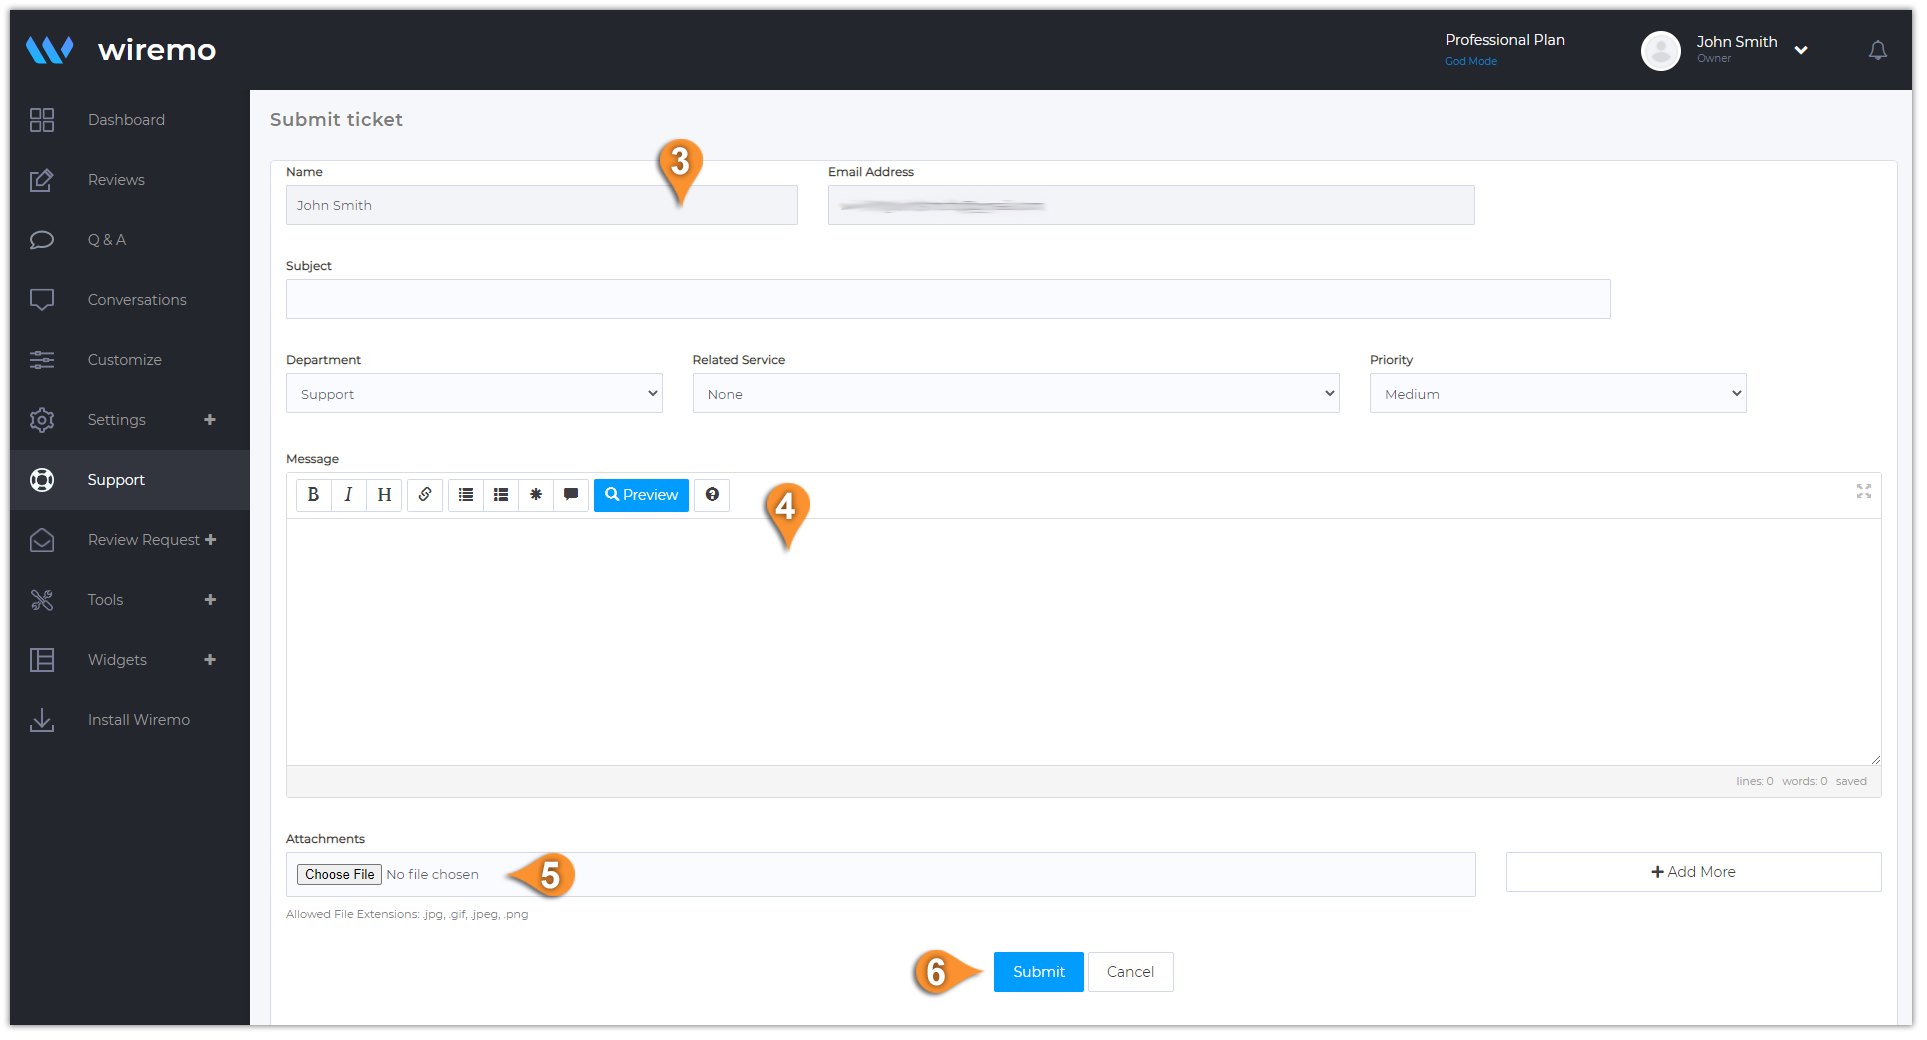
On the next page, please add all the required information (pin 3): your “Name”, “Email Address”, “Subject”, “Urgency” type, “Department” and “Related Service”. Then type your message (pin 4). You can also attach some files if it's needed (pin 5). Once you're done, just click on the “Submit” button (pin 6).

How to Submit a Ticket


Thank you for choosing Wiremo.

June 21st, 2018

How Can I Change my Account Password

Hi! In this short tutorial, we will explain you how to change your password in Wiremo Dashboard.


Change account password

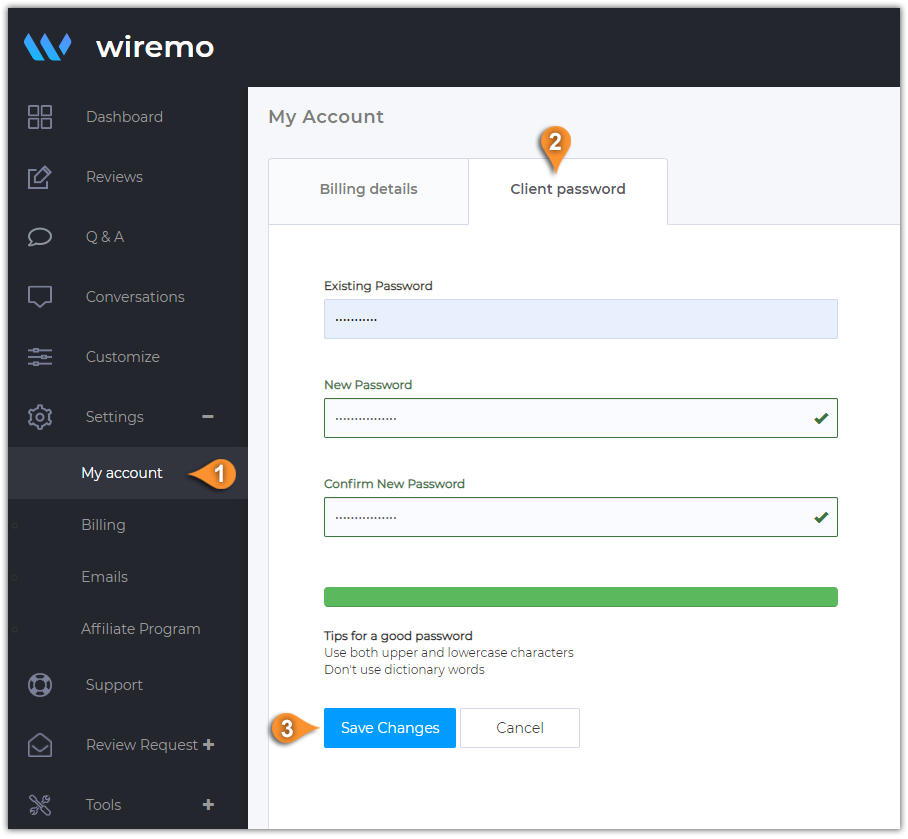
To change your account password, please login to Wiremo Dashboard, go to “Settings” and then click on “My account” (pin 1).  Now, press on the "Client password" tab (pin 2). In this tab, you can change your password. Type the existing, then the new one and confirm it. Once you're done press “Save Changes” button (pin 3)!

How Can I Change my Account Password


Thank you for choosing Wiremo!

June 21st, 2018

How Can I Update my Account Billing Details

Hi! In this short tutorial, we will explain you how to update your billing details in Wiremo Dashboard.


Update billing details

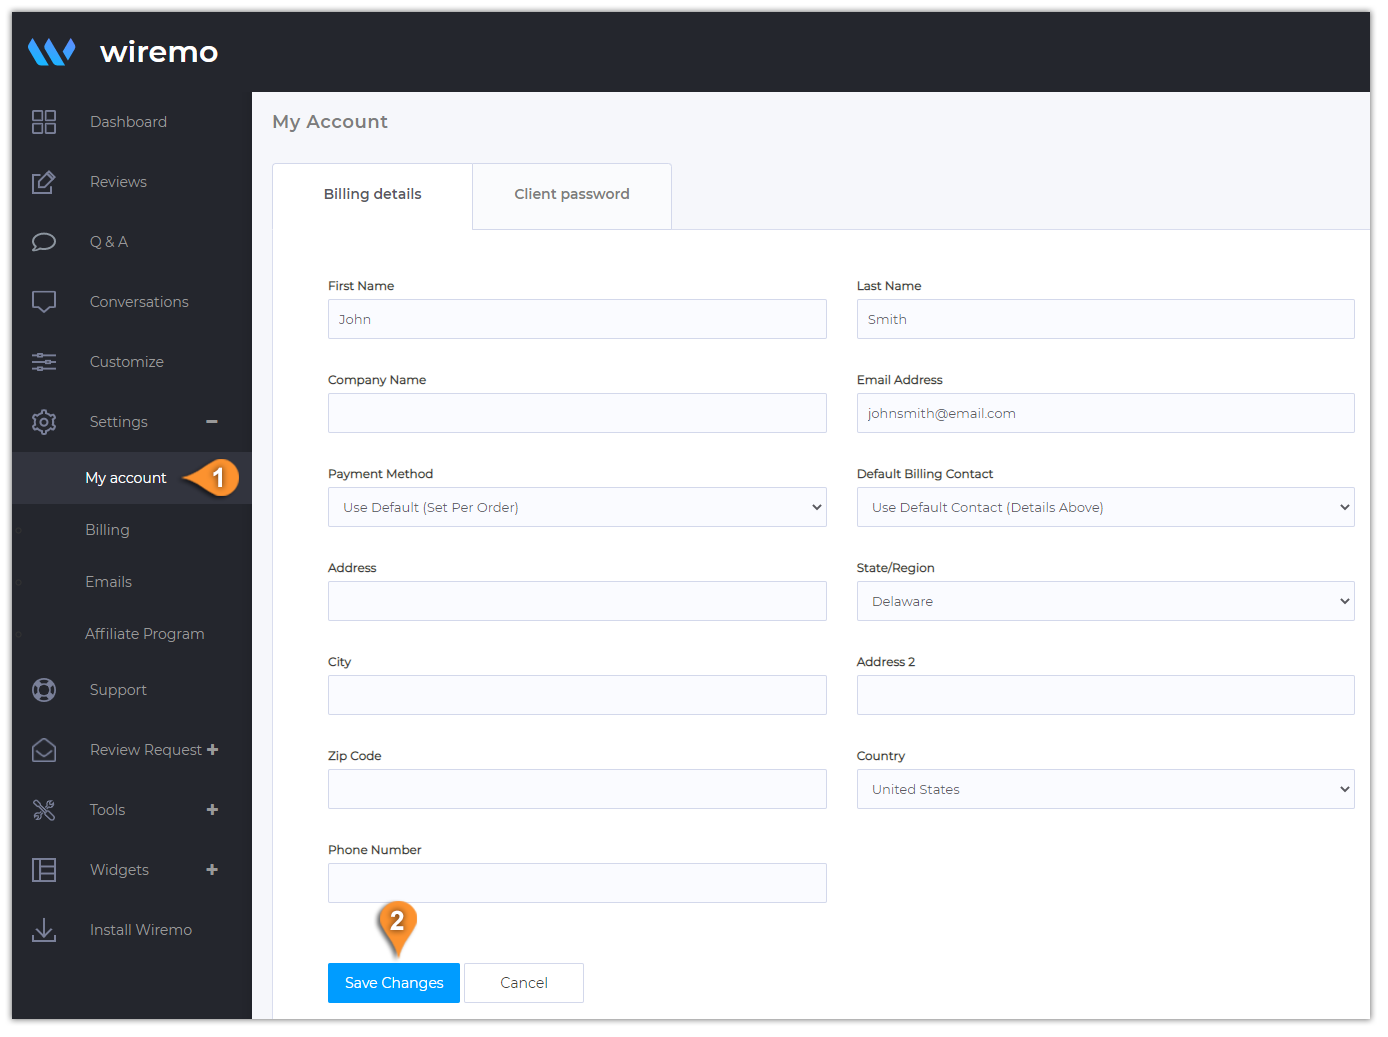
To update your billing details, please login to Wiremo Dashboard, go to “Settings” and then click on “My account” (pin 1).  Now, in the "Billing details" tab you can fill out your billing details!

If you also want to change your account password, you can do it from the same section. Just go to the “Client Password” tab, enter your current password, then your new one, and click “Save Changes.”

Once you are done with updating your billing details, press the “Save Changes” button (pin 2).

How Can I Update my Account Billing Details


Now you're done! Thank you for choosing Wiremo!

June 21st, 2018

How to Pay an Invoice in Dashboard

Hi! In this short tutorial, we will explain you how to pay your invoices in Wiremo Dashboard.

Note:Please make sure you have updated your billing details before paying the invoice!


How to pay an invoice

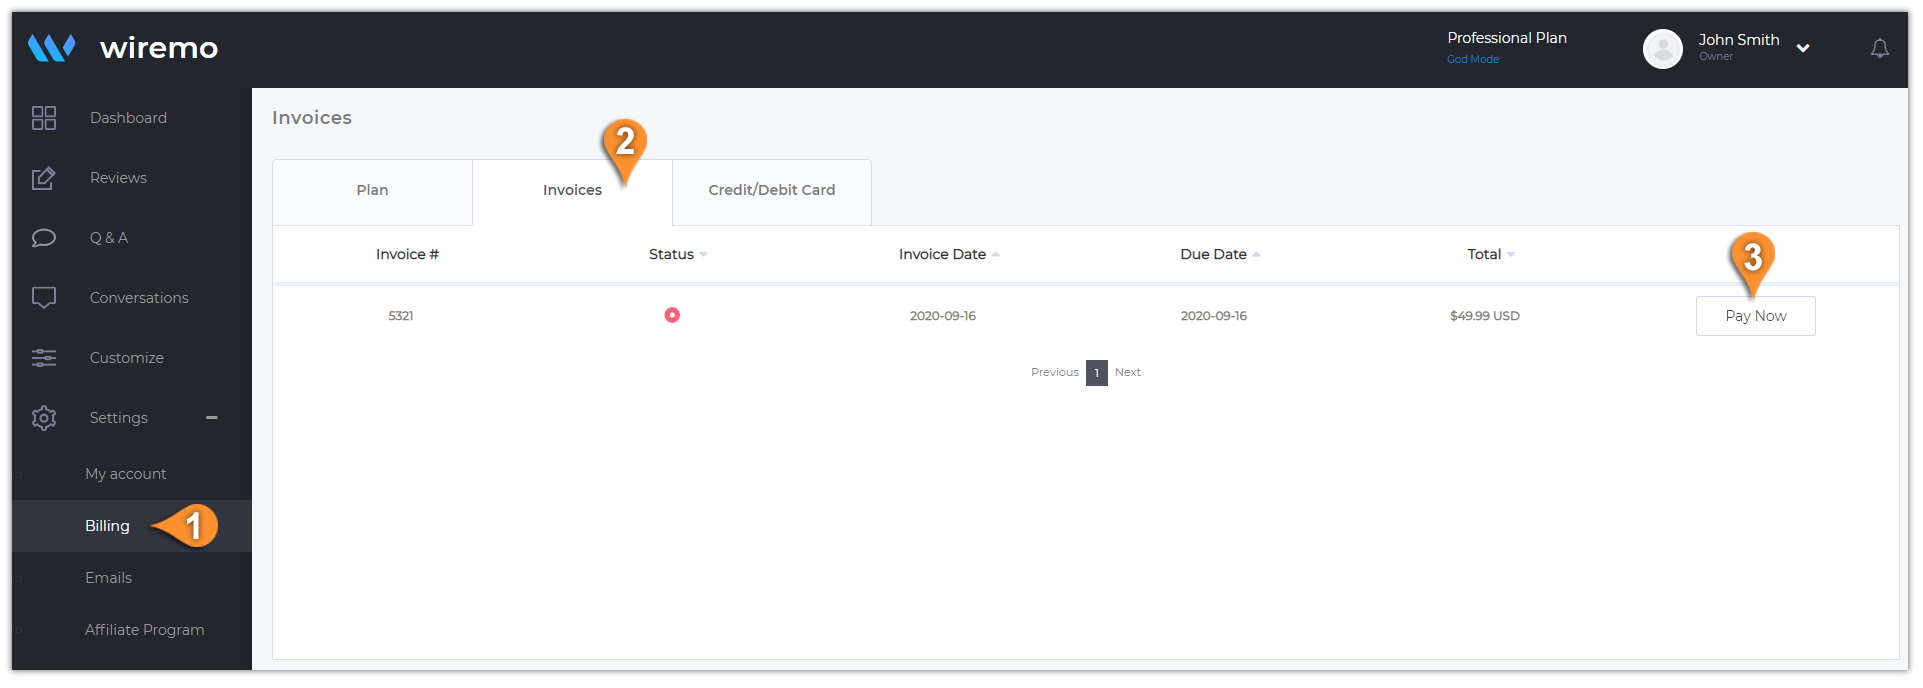
To pay an invoice, please login to Wiremo Dashboard, go to “Settings” and then click on “Billing” (pin 1).  Now click on “Invoices” tab (pin 2). Find your unpaid invoice and press on the "Pay Now" button (pin 3).

How to Pay an Invoice in Dashboard


If you already have a card saved to your dashboard you can use it, or you can select to use a new card and submit the payment.

How to Pay an Invoice in Dashboard


Thank you for choosing Wiremo!

June 21st, 2018

How Can I Upgrade to Essential or Professional Plans

Hi! In this short tutorial, we will explain you how to upgrade your package to our Essential or Professional plans.


How to upgrade

To upgrade your plan, please login to Wiremo Dashboard, go to “Settings” and then click on “Billing” (pin 1).  Now click on the “Upgrade” button (pin 2)

1 2


Choose which Plan (Essential or Professional) and the billing cycle you want, then click “Next” and proceed with the payment.

2 2


If you have a promo code related to one of our special offers please paste it in the input box "Promotional Code" and then press the "Validate Code" button. Once it's done just press the "Click to Continue" button.

Note: The updated price you will see once you'll press the "Click to Continue" button.

3 3


How Can I Change Credit Card Details?

Thank you for choosing Wiremo.

June 20th, 2018

How to Reply, Accept, Decline, Mark as Pending or Delete Reviews

Hi! In this short tutorial, we will explain you how to accept, reply, decline or mark as pending your customer reviews.


Moderate in the reviews tab

To moderate your reviews you need to login to your Dashboard and click on the “Reviews” tab (pin 1) in the main menu. You can accept, decline, reply, open a conversation ("Reply as ticket"),  migrate reviews, delete or change the status without opening the review. Now there are 3 ways to moderate reviews:

  1. You can select one or more reviews (pin 3) or you can select all of them (pin 2). Once the reviews are marked as selected just choose the desired action in the opened blue menu (pin 4).
  2. You can use the setting gear for every review.
  3. Also, you can use the drop-down menu with the options for all your reviews (pin 5). 

1 3


Moderate using the settings gear

As you can see from the screenshot below you have a lot of settings for every review:

  1. Mark as pending - Only you as admin can see the review
  2. Decline
  3. Reply - Write feedback to the review you've got.
  4. Mark as Verified
  5. Mark as Unverified
  6. Reply as ticket - open a private conversation with your customer
  7. Migrate - you can migrate your review. Check our detailed tutorial - How to migrate customer reviews.
  8. And of course, you can delete the review.

3

Important:

  1. Deleted reviews will be marked with a black circle status (pin a).4 3
  2. Deleted reviews can be restored within 48 hours. This option is available only for our Professional and Custom Plan users.
  3. If you want to find or hide your recentely deleted reviews just use the Status Filter (pin b) and tick the Deleted Status (pin c). Then press the "Apply" button.3 5


Moderate all reviews

The option to moderate all reviews also includes all actions related to a review, except open a conversation. But also here is an important option to export all your customer reviews to a CSV file. You can find out more information in our dedicated tutorial - How to export customer reviews.

2


Moderate in the review page

For more options, you need to click on your review to open it. Once you're in, you will have 3 main moderation zones. In the top menu (pin 7) you can approve a review if it's pending or vice versa, decline, ask to update, or delete the current review. The second menu (pin 6) is placed under the review. Here you can reply to the review and edit it if you found some mistakes.

Also an important list of options you can find in the sidebar. Here you can see your customers' info:

  • First and Last Name
  • The review source
  • Email address
  • GEO source
  • IP Address
  • Link to the customer review page source
  • Identifier
  • Verified buyer - you can easily mark the current reviewer as a verified customer.
  • Review sentiment - Using AI you can see what the text is expressing, is it neutral, positive, or negative.
  • Review Keywords - Using AI  find and show the most used words from your latest customer reviews related to the current one.

It sometimes happens that some clients make mistakes when they write a review. This kind of mistake can occur while typing the name, email address, or even reviewing a different product from the one that was bought. You can easily fix all these mistakes without contacting the client, directly from the Wiremo Dashboard. You can correct your client name, email address, link, and product ID. (pin 8). The edit and copy options will appear on hover.

2 3


Thank you for choosing Wiremo.
June 19th, 2018

How do I Set a Verified Buyer Label for a Review

Hi! In this short tutorial, we will explain you how to mark a review with the "Verified buyer" label.

Important:Please note that you can mark as verified only those reviews that were left by people who confirmed their email address. Anonymous reviews or reviews with unverified email cannot be marked as verified.


Video tutorial

For an easier way to find out how to set the "Verified buyer" label, you can watch the following video tutorial or follow the steps below it.


How to set the "Verified buyer" label

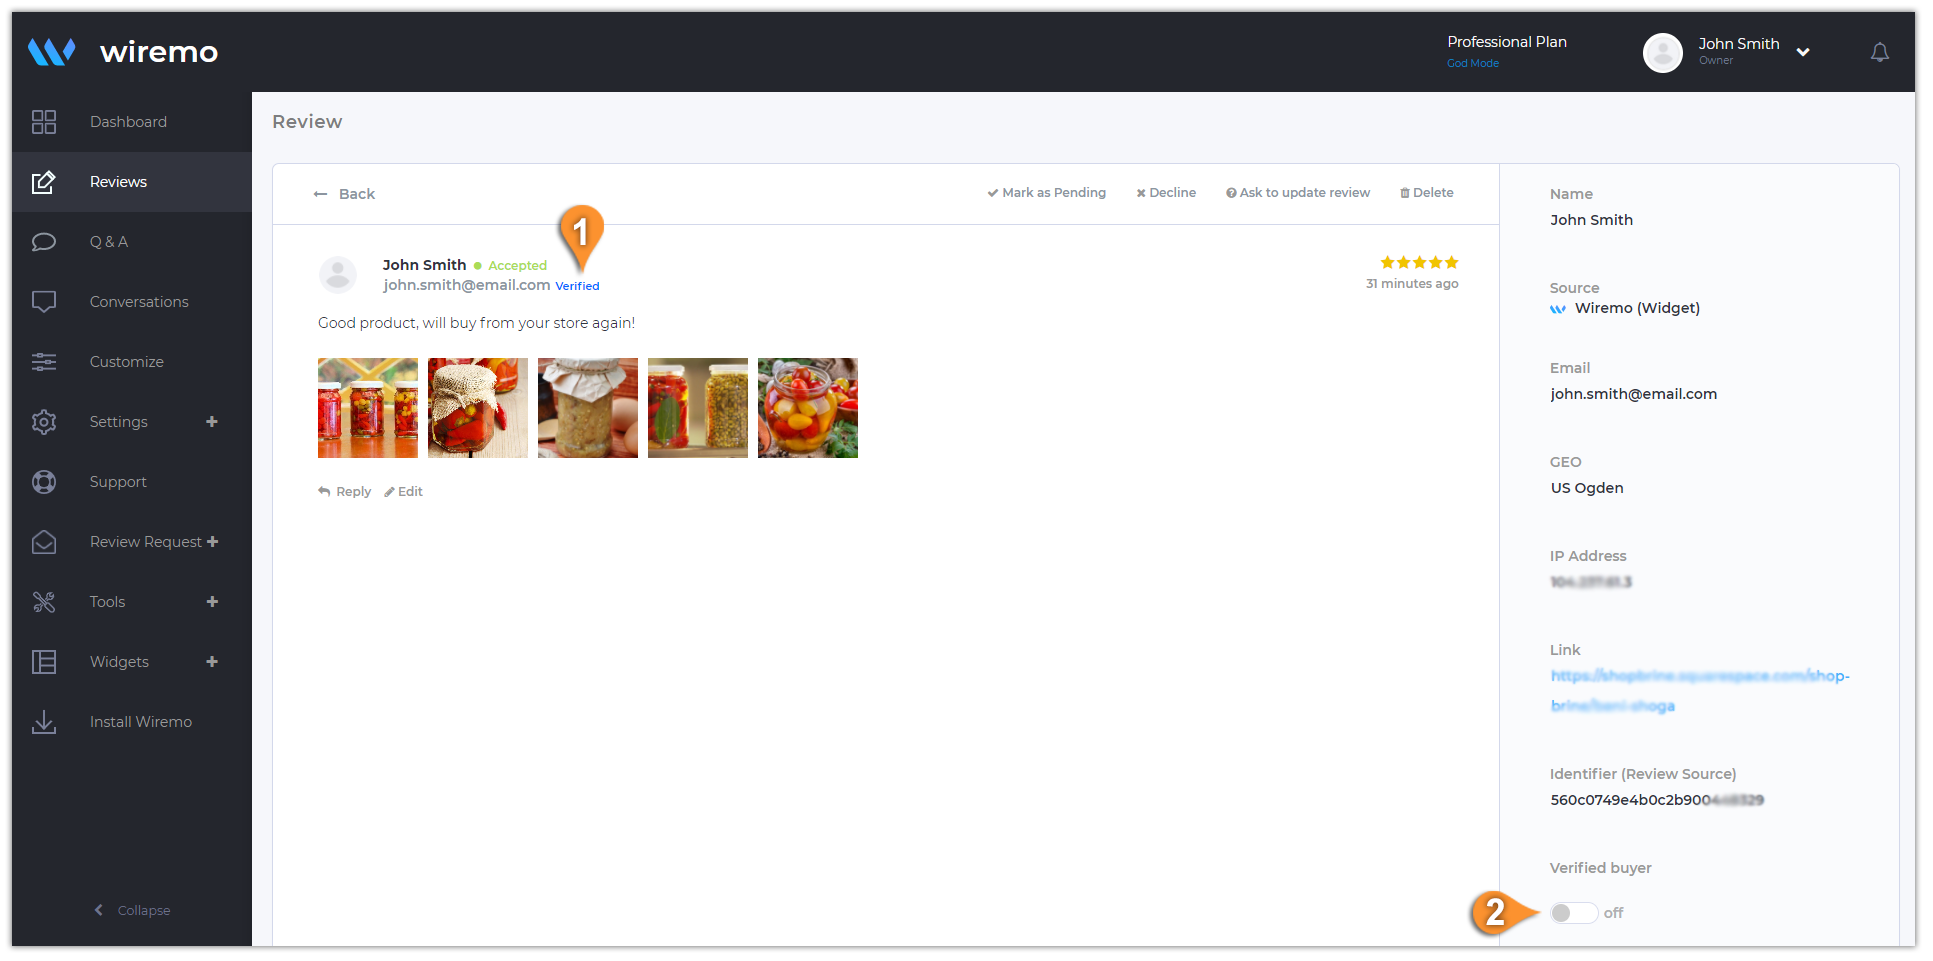
So you've got a new review. Once you open it in the dashboard, you can see your review details. First of all, you may note that the email status is marked as "Verified" (pin 1). It means that your customer confirmed the email address. Now to mark this review to as verified, at the lower right corner just enable the "Verified buyer" option (pin 2). After that refresh the page where your review is being displayed and check. It should be marked as verified.

How do I Set a Verified Buyer Label for a Review


How to ask a customer to confirm email address

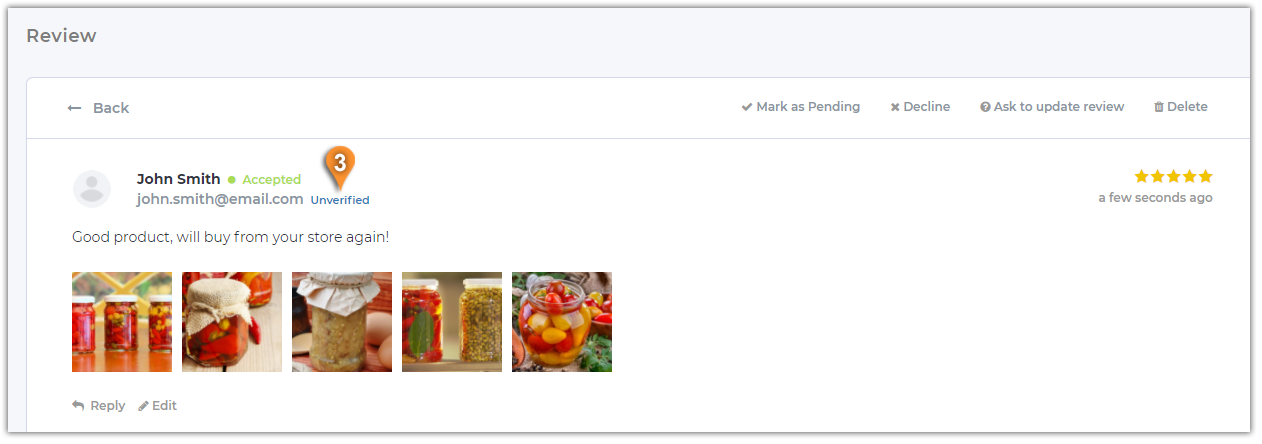
If you enabled the "Verify review email" option in your dashboard, then every customer who leaves a review will instantly get a request to confirm the email address. As you already know, to mark a review with the "Verified buyer" label,  the reviewer's email should be confirmed. In the image below you can see an example of a review with "Unverified" status. To ask again your customer to confirm email address just press on the "Unverified" link (pin 3).

How do I Set a Verified Buyer Label for a Review


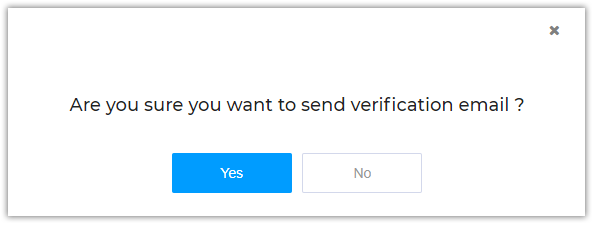
In the opened pop-up window just confirm that you want to send a verification email.

How do I Set a Verified Buyer Label for a Review


Thank you for choosing Wiremo.
June 18th, 2018

How to Setup Wiremo Widget - Universal Code

If you don't use one the platform listed in our support page then follow next steps to setup Wiremo widget on your website.

More Blog posts