Our goal is to make communication between you and your customers as productive as possible. That's why we are pleased to present you with Wiremo triggers, the fastest and easiest way to say "thank you" to a customer for their review or to solve a customer's issue immediately.
Video tutorial
For an easier way to setup Wiremo triggers on your website, you can watch the following video tutorial or follow the steps below it.
How to setup and use Wiremo triggers
There are 3 types of triggers: Pop-Up, Open Conversation and Auto-Reply.
The Open Pop-up option allows you to show an instant "thank you" message to your reviewers. You can edit the text and adjust the color so your pop-up will fit perfectly with your website’s design.
The Open Conversation trigger was created basically to help you get in touch with customers who wrote a bad review. It will automatically open a conversation where you can ask the reasons for such a low rating and offer to help them. At the same time, you can use for a private reply in case of positive reviews.
The Auto-Reply triggers are the special one. It allows you to preset unlimited number of automatic replies for every rating separately or as we made: positive (5 or 4 stars), negative (1 or 2 stars) and neutral (3 stars). Below we will explain all the advantages of this trigger.
Let's see these triggers in more detail.
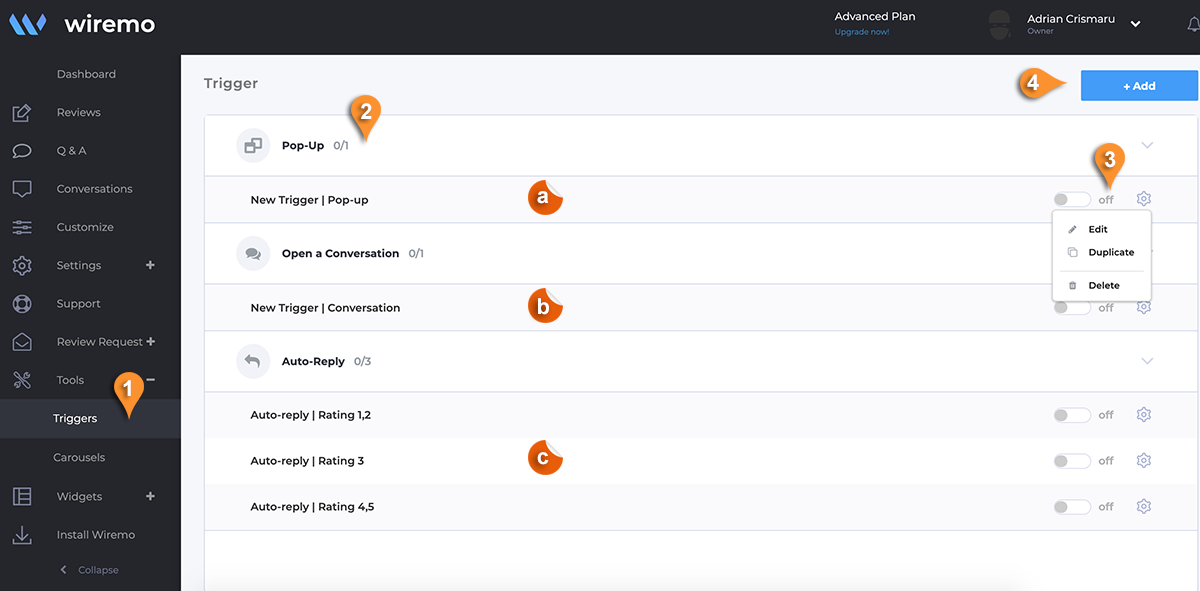
To find the triggers, go to your Wiremo Dashboard, then click on Tools and select Triggers (pin 1). As you can see in the screenshot below, there you should find predefined replies for each type of trigger (pin 2). They're defaulted to be OFF, but can enable or edit, using the gear, at any time (pin 3).
Note:In the settings menu you have the option to "Duplicate" a trigger. When you duplicate a trigger it will make a copy of it with the same name + word copy. ex: "Conversation | Rating 1,2 copy". The copied trigger will not have the rating settings enabled as you can't have a trigger with duplicated rating settings. You cannot set 2 or more triggers of the same type for the same rating. If you already have a trigger for a specific rating and try to create a new one, you will be notified.
We have 3 types of predefined triggers:
1. Pop-up trigger to say thank you to your customer after review (label a)
2. Conversation trigger to open a conversation when you get a review with rating 1 (label b).
3. Auto-reply triggers with 2 replies each for negative (rating 1,2), neutral (rating 3) and positive (rating 4,5) reviews (label c).
You can edit them as you wish or create new ones. To create a new trigger, click on the "+Add" button (pin 4).
Open Pop-up trigger
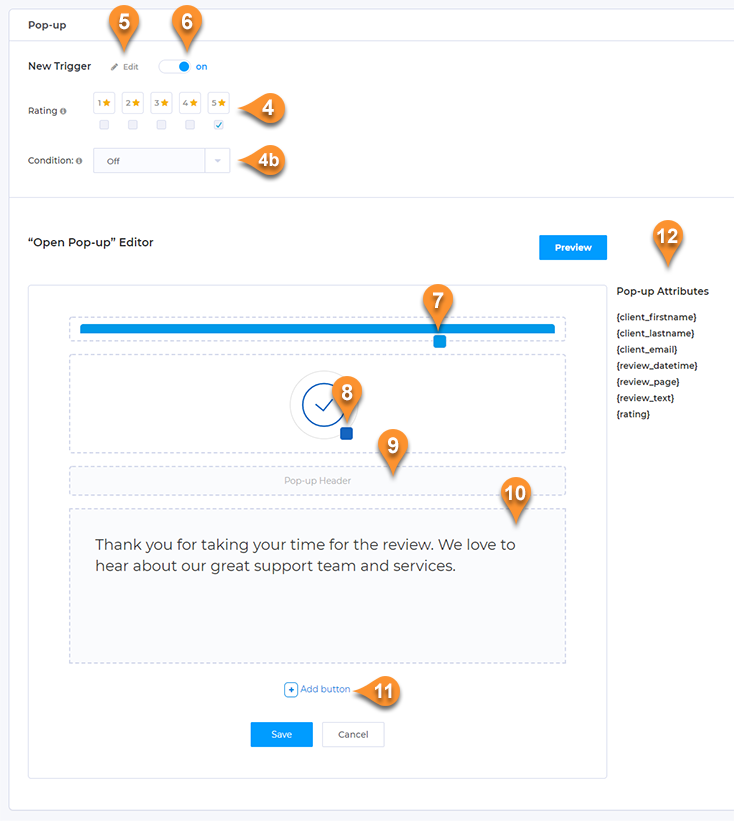
1. Once you create a trigger, you will have to configure it. You can edit the name by clicking on the edit link (pin 5). To start or pause the trigger, just click on the status jumper (pin 6).
2. Set the Rating (pin 4) and the Condition (pin 4b) for which you want the trigger to react. You can select multiple ratings for one trigger. The Condition option provides you the possibility to include or exclude for which products the trigger will work or not. Once enabled, enter one or more identifiers comma separated. The identifier is a product ID. Below you can see an example:
- Include - The trigger will work only for the products you want.
- Exclude - The trigger will ignore the selected products.
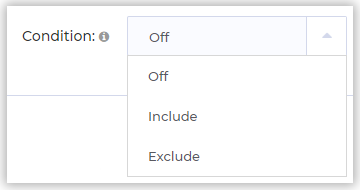

You have the option to disable the additional condition at any time.
3. Once the general setup is done, you can start to adjust your pop-up design. You can change the colors of the header bar (pin 7) and icon (pin 8). Of course, you have full access to edit the header text (pin 9) and the main text (pin 10).
4. If you want to redirect the client to a specific page, you can add a link or add one or two buttons by clicking on the "Add button" link (pin 11).
5. Also, we've added, "Pop-up Attributes" (pin 12). These are small shortcuts that will help you make your Pop-up message more friendly. Just click on the Attribute you need and it will be added automatically into the text. You can add: Clients First and Last Name, e-mail, your client review text, date and rating and also place the link your customers reviews page.
Note:Please note that you cannot set 2 or more triggers of the same type for the same rating. If you already have a trigger for a specific rating and try to create a new one, you will be notified.
6. Once you are done adding a button, you can adjust it too (pin 13).

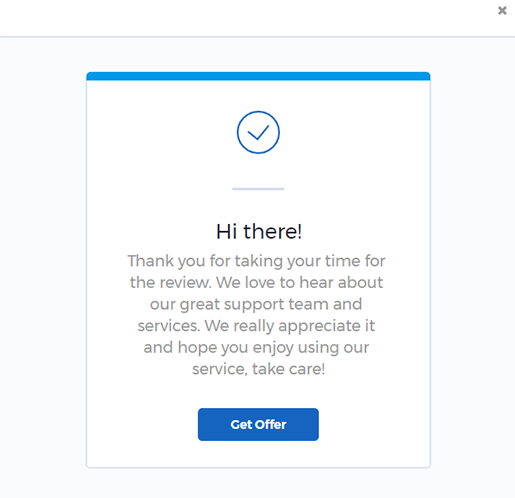
7. When you have finished all your adjustments, you can click on the "Preview" button to see how your trigger will look when live.
8. Don't forget to click the "Save" button.
Open Conversation trigger
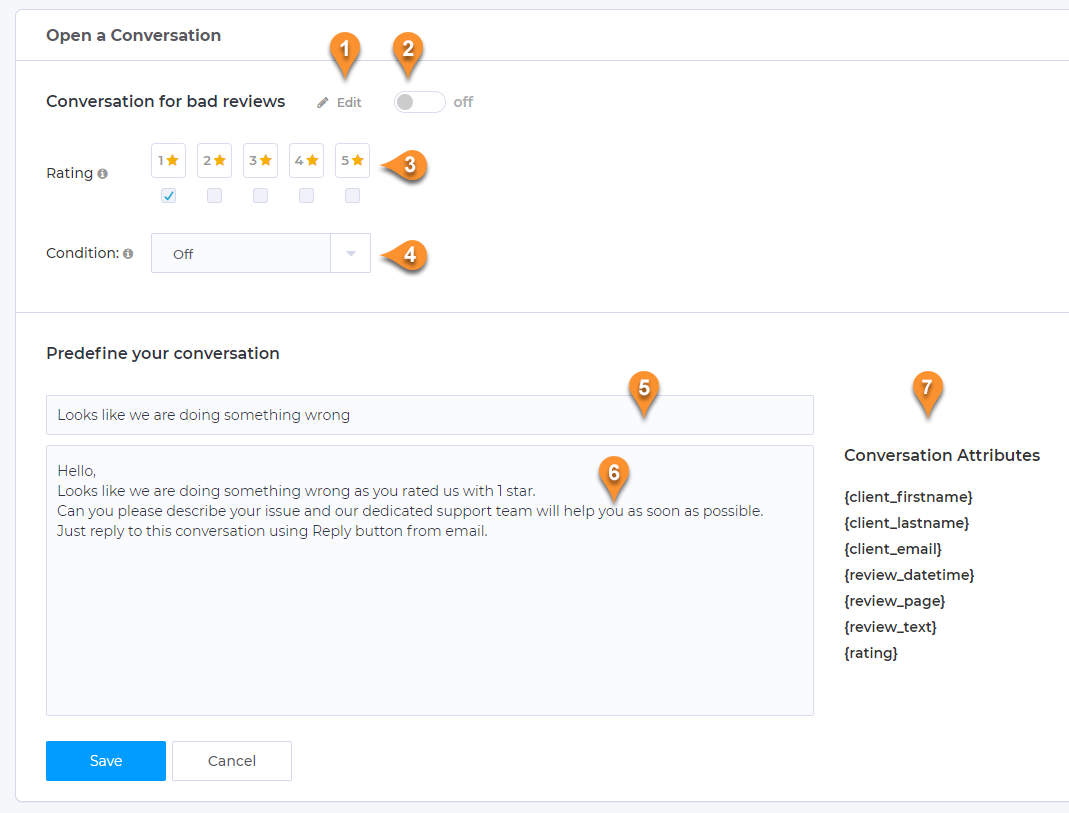
Sometimes businesses don't want to bother their clients with pop-ups and would rather tell them "thank you" in a private way or offer to help them solve an issue indicated by their rating. This is where the Wiremo Open Conversation trigger comes in. The main settings for this trigger are the same as for the others, you can edit the title (pin 1), change the status (pin 2)) and rating (pin 3).
Also the same settings for additional conditions (pin 4). The Condition option provides you the possibility to include or exclude for which products the trigger will work or not. Once enabled, enter one or more identifiers comma separated. The identifier is a product ID. Below you can see an example:
- Include - The trigger will work only for the products you want.
- Exclude - The trigger will ignore the selected products.
You have the option to disable the additional condition at any time.
As you can see in the image below, the main difference is in the predefined conversation message. Once you open the editor you will find two text fields. One is for the conversation subject (pin 5), and another for the conversation message (pin 6).
Also, we've added "Conversation Attributes" (pin 7). These are small shortcuts that will help you to write your message more friendly. Just click on the Attribute you need and it will be added automatically into the text. You can add: Clients First and Last Name, e-mail, your client review text, date and rating, and also place the link to your customers' reviews page.
Note:Please note that you cannot set 2 or more triggers of the same type for the same rating. If you already have a trigger for a specific rating and try to create a new one, you will be notified.
Open Auto-reply trigger
There are a lot of businesses that get many reviews each day and it becomes hard to reply to all of them, but this is very important. That's why we've developed this kind of trigger. You can set some replies or use the predefined so all your customers will see that you care and this will increase their loyalty.
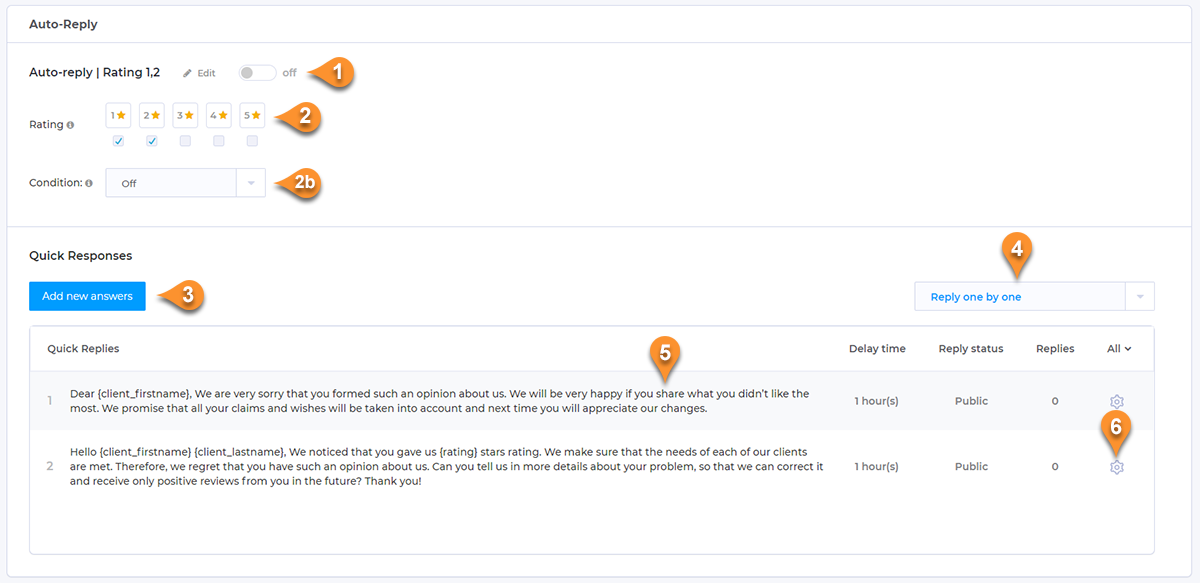
You can enable or disable and edit the trigger's title (pin 1). You can choose the rating for which you want the trigger to react (pin 2). The Condition option (pin 2b) works the same as for the other triggers. It provides you the possibility to include or exclude for which products the trigger will work or not. Once enabled, enter one or more identifiers comma separated. The identifier is a product ID. Below you can see an example:
- Include - The trigger will work only for the products you want.
- Exclude - The trigger will ignore the selected products.
You have the option to disable the additional condition at any time.
Also here are some special things to mention
- We've prepared predefined replies for 3 types of ratings: positive (5 or 4 stars), negative (1 or 2 stars) and neutral (3 stars) so you could use them from the beginning (pin 5).
- You can always add new answers so the auto-reply messages will be much more random (pin 3).
- You set the way to reply: "Reply one by one" or "Random reply" (pin 4).
- To edit or delete a message use settings gear (pin 6).
Note:Please note that you cannot set 2 or more triggers of the same type for the same rating. If you already have a trigger for a specific rating and try to create a new one, you will be notified.
Important:When you select the option "Reply one by one" (pin 4 from the preview screen), please note that you can anytime change the sequense of the messages using drag-and-drop.

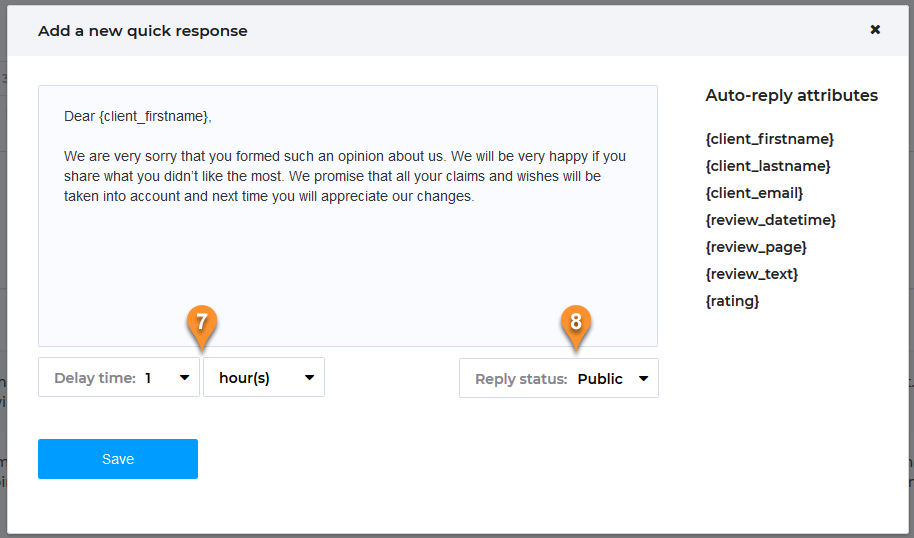
Add or Edit an Auto-reply message
While adding a new message or editing an existing one, there are some special settings. You can set the "Delay time" for the message you've written (pin 7), and you can select the reply status: Public or Private (pin 8).
Also, we've added "Auto-reply attributes". These are small shortcuts that will help you to write your message more friendly. Just click on the Attribute you need and it will be added automatically into the text. You can add: Clients First and Last Name, e-mail, your client review text, date and rating and also place the link to your customers reviews page.
That's it. Set up your Wiremo triggers now and get closer to your customers because Wiremo is the shortest distance between you and your customer.